Showing posts with label The Crafter's Workshop. Show all posts

Saturday, September 28, 2024

Busy, busy, busy...

I am so sorry I have been absent without a word.  Life can definitely get busy and sometimes unexpected events lead to adjustments.


I will be posting again soon.  In the meantime you can look for me on Instagram and Pinterest as well as enjoy a nice peek at some artsy goodness while you're patiently waiting.  And I really do appreciate your patience in all this.


Some stash busting tape I made using shipping tape, die-cuts, paint, and stencils.  I posted this and another photo on my Instagram page is you'd like to take a look!


Thanks for stopping by and let me know what you do to bust your stash!


Saturday, February 17, 2024

For the Love of Texture

I'm so sorry I've been quiet.  Sometimes life gets in the way.  But I'm trying to rework things so it should be better in the future.

You may recognize some of these ATCs from previous posts.  This is a photo I took after I was having more playtime with my supplies.

I had ATCs leftover from a piece of 12 x 12 scrapbook paper where I didn't like the pattern side of it.  I also have old tags in my stash.  Unfortunately, some of my paint supplies dried out.  No they weren't open.  I had Dina Wakley tubes and some Dylusions tubs, so bright and colorful.  Very disappointing.  I can imagine a lot of reasons.  Air could have possibly gotten in at some point.  Life events, moving, or somple mistakes that you're not expecting can cause it.  I remember using them, but I went through a big dry spell due to life, so it's possible that dry spell affected my supplies.  On the plus side, my mediums seem to be okay for now.  And while I love a good psychic, or medium, that's not the type of medium I'm talking about.

Now I have not gone to art school, nor have I taken any strict art classes.  I've taken in person and online classes from several artists (Dina Wakley, Dyan Reaveley, Joanne Sharpe, and Dawn DeVries Sokol come to mind).  In taking the classes, reading blogs, magazines, all of that, I've learned techniques and terms.  Mediums in art are things like gesso, texture paste, and gel medium.

I like using paint with stencils, but .  Also, different paints have different thicknesses.  Some are heavy body so they hold form very well, others are free flow, so they are good for gelli printing.  But for this experiment I wanted more depth without compromising the color.  Most colors I don't mind them being lighter.  However, I'm not the biggest fan of pink.  I can handle it in certain cases, but I was using red, and didn't want pink.  So I know I couldn't use gesso.  Enter texture paste.  I grabbed some red paint, mixed it with texture paste, and used it with a stencil to add the mixtures to some ATCs and tags.  The picture is the result.


I also had some green/blue watered down paint that I didn't want to let go to waste, so I had some play with both stencils and freehand brush strokes.


When you play, do you have a plan or do you just see where things go?  What was the result?  I'd love to hear more!  Come back soon!

Saturday, February 3, 2024

Ugh

I was playing around making ATCs and I discovered something interesting with this one...


Come back tomorrow to find out more!


I'm also entering the following challenges:

Simon Says Stamp Monday Challenge


Do you like this ATC?  Let me know and have a great day (or night)!


Saturday, January 27, 2024

What Attitude?

Anyone have a teenager in your life?  If so, then you can definitely relate to this tag, heh.  I think at some point in adolescence, everyone has to deal with a moody teenager.  Not that attitude is limited to teenagers, far from it!  So I wanted to pay a little homage to the sass we all can exhibit from time to time.


I covered a vintage tag in gesso and used my Dylusions sprays and my stencils to start a nice background.  Then I used more stencils and paint to add some more patterns.  I also smeared some watered down orange paint then added my other elements.  Inspired by my Dylusions border stamps, I doodled the border.  I grabbed some tissue paper from a package I had received and hand cut a star, and used The Crafter's Workshop Gel Medium to adhere the tissue paper star.  I stamped the word "ATTITUDE" with my alpha stamp and my Archival Black Ink, and colored an Oddball Art boy digi stamp with my Tombow markers.  I also adhered a couple Tim Holtz gears and colored some little chipboard alphas with my Uni Posca green paint pen and adhered them as well.  I threaded some yarn through the top and my tag was finished.

I'm also entering my tag in the following challenges:

Simon Says Stamp Monday Challenge

Through the Purple Haze Challenge


I've included affiliated links for items I used for this project or similar products.  If you click the link I get a small commission.  The price does not change at all for you.  Enjoy the links and thank you for your support!


What do you think of the tag?  Let me know in the comments and thank you for stopping by!


Friday, January 19, 2024

Fun with mixed media

Hey everyone!  I'm so sorry I've been quiet.  Life can sometimes get in the way for sure.  Have you eve gone through that?  You have a to do list, or something that you keep wanting to do, and then one thing comes up, then another, and then you realize your goof?  Yep, that's me.  But I missed all of you, and wanted to share some new projects.


This tag is one of them.  It combines stamps, die-cuts, stamping, paint splatters, and ink drips.  I really like it.

I'm entering my tag in the following challenges:

Crazy is Our Fame Challenge

Creative Fingers Challenge


I've include affiliated links for items I used for this project or similar products.  If you click the link I get a small commission and there's no price change .  The price does not change at all for you.  Enjoy the links and thank you for your support!

What are some ways you use your mixed media?  Thanks for stopping by!


Sunday, November 12, 2023

A Feather in Your Cap

How is it the weekend already?  Sometime the week goes by in a flash, and sometimes it drags, but the weekend always seems to go fast.  I hope you're enjoying your weekend and doing something fun.  A big part of life is filling your tank.  I don't mean gas for your car, but kinda.  I'm talking your emotional tank.  Doing something fun, being with people you care about and who care about you, and maybe enjoying some outdoors.  Breathing fresh air, there's just nothing like it.

Now I don't know about you, but I like to play.  Paint, stamps, stencils, there's no end to the glory of art supplies.  They're all so awesome!  But sometimes I get stuck.  I want to just put everything together, but I don't always have the patience.  Sometimes I freeze up because it's not going the way I thought it should.  And I have to remember there's no should.  It's something I'm always practicing, because there's really no end to playing.

Case in point, this ATC.  It did not go as planned, but I was inspired by a video I saw on YouTube, only in the video it was a tag.  And while I didn't have everything in the video, I used what I had, including a stamp from a stamp set I had never used before this.


I have a bunch of ATCs and tags that have bits of paint and gesso and all kind of media on them.  This ATC is one of them.  I had put Liquitex Gesso through a TCW's Ledger stencil and it had some Liquitex Bright Aqua Green, neon yellow and neon orange paint.  I added more paint in a couple other colors, then used a Sharpie to trace ABC down the side.  After that I used Reeves Watercolor Crayons to add some color in the letters and used a waterbrush to spread the color around, going outside the outline on purpose.  It's not all about coloring inside the lines.  I have a few waterbrushes, all the same tip style.  You can get all the same or assorted tips.  Here's a set with different styles of tips, to allow for different effects.  If you want to dip your toe in, here's a single, fine tip waterbrush to play with.  I'm not sure if you can find Reeves crayons, but there are several other options, such as this set from Staedtler, a Faber-Castell set, and this set from Prang


There's a couple different stamp sets at play here.  I have a bunch of small ones in my stash, and I'll have to start using them, I guess, right?  Most I used my Archival black ink, but the "NO LIMITS" was stamped in Distress Ink Peacock Feathers.  I also used a dark purple marker to add dot doodles in a few spots, and a Uni Posca white paint marker to trace the triangles.  The sentiments are from my stash.  The feather I stamped on white cardstock with the same black ink pad as before.  Then I used the Reeves watercolor crayons and waterbrush to spread the color, and added some bits of darker color with markers.  I cut them out with Tonic scissors and used Alene's Tacky Glue to attach the feathers and thread that I bunched up for a little extra texture.


I've included affiliate links to many of the products I've used or similar products, which means if you use the links to make a purchase, I make a small commission with no price increase for you.  I really appreciate your support.  I hope you enjoyed your visit and enjoy the rest of your weekend

Wednesday, September 20, 2023

Mini Art Journal Day 14


Hi there my crafty friends!

I'm so glad you're visiting!  I have another page in my mini art journal for the Art Marks Challenge from Rae Missigman and Sandi Keene.

Day 14 - Connect


How do you connect?  What do you want to connect to?  I think we all seek some sort of connection.  It can be a struggle for some.  I'm trying to reconnect.  And to deepen my connection to certain parts of my life.  One part that I think many of us adults neglect is our inner child.  I don't think it's planned, but we get caught up in life and lose track of having fun.  So my page for this prompt is about connecting with your inner child, and learning to love that part of yourself.

I'm also entering my page into this challenge:

Simon Says Stamp Monday Challenge

Simply Create Too #194

For some Art Marks Challenge history, you can click here.  And Rae's Instagram account here shows what's she's making for each prompt.  For those who haven't seen my previous posts yet, I'm working in a mini art journal I made out of envelopes, but you can use many different things, including scrap or underpaper, so some pages already had stuff on them.  A hole punch and some baker's twine later and a mini art journal for the challenge ready for art!

I've posted either groups or individual.  We'll see how I'm feeling for the rest.


I really like blue, but I kinda wanted to be more subtle with using it on this spread.  I started with underpaper as a foundation.  I've come to love underpaper.  It's basically the paper your surface (desk, table, work surface of your choice) is covered with, and it gets covered with whatever you work with.  Ghost prints of stamps, paint swatches, swipes, test doodles, just about anything art wise.  Eventually it gets covered enough and can be used as collage paper, die-cutting, so many possibilities.  And I was able to incorporate things from the background into my page.


 There's plenty of stamped images, including a border stamp set from Dylusions rubber stamp set, a large mini star stamp and a bigger stars acrylic stamp from my stash.  I chose balloons to represent my inner child.  What child doesn't love balloons?  Thinking about it, what adult doesn't love balloons?  Balloons are fantastic in their simplicity.  I used a chipboard heart, a die-cut from my stash, and two digital images from Oddball Art.


I swiped the bottom of my page with my purple Sakura solid paint marker.  My chipboard heart is covered in gesso and some ink and paint splatters.  I used colored pencils and Tombow markers to color in the blue and green heart.


I also used my Uni Posca white, orange, and black paint markers for filling in the stars, x's, and adding my doodles.  I filled in a couple corners with The Crafter's Workshop Well Rounded stencil and Artist Loft red paint.  I used a Moodclue blue chalk marker to make the balloon strings and a Balzer Designs rubber stamp set for the x's on the balloon strings.


I also added some ink drips with Liquitex Phthalocyanine Blue Green ink.  Lastly I added a sentiment from my stash.

Thank you so much for stopping by and checking out my art journal page.  Bye for now!

Sunday, September 10, 2023

Adventuring in my Mini Art Journal - Day 10

I'm so glad you're continuing on this adventure with me!  Hello, again, and I've got Day 10 of my Art Marks Challenge journal to share with you today.  It's been pretty busy around here, but having a little creative time is just the ticket.  The Art Marks Challenge is from Rae Missigman and Sandi Keene.  It was technically last month, but I'm still catching up.

Day 10 - Quit


For some Art Marks Challenge history, you can click here.  And Rae's Instagram account here shows Rae's interpretation of the prompts.  Rae made tiny cards and put them into this gorgeous little pocket journal, which is super thick.  I'm pretty jealous.

It also got me thinking about rules.  Art has some rules.  Mix certain colors of paint, like red and green, you'll get mud.  Bookbinding has certain rules and tools to make those gorgeous journals I've seen.  However, the idea of making little cards and then adding those cards to an already existing journal, as Rae did, never occurred to me.  And I love the chunky books, so it makes great sense.  And gives me permission to do the same, which I intend to do at some point.  For now, I'm still working in the journal I made, though I pulled it apart to help with photographing.  I'll share a picture of it once it's actually done and put together again.


I'm going to be posting all my pages.  For the most part it's been individual pages, but a couple have been groups and I may do a few more posts like that.

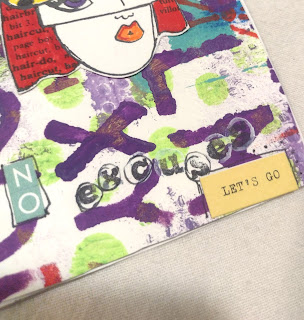
For the Day 10 prompt of Quit, I had to pause for a moment.  We all know the phrase quitters never win and winners never quit.  We also all know people in our lives that run the gamut from ready to quit at a drop of a hat to those that won't stop even when all the signs are saying to make a smart retreat and try a new angle.  In both of those scenarios, and everything in between, there's the behind the scenes of leaving.  What is wrong with the situation to make a person want to quit or decide it's not worth it and a different tactic is better.  It's usually reasons or excuses.  What the difference?  Excuses gets you out of stuff without blame, while reasons are considerations to either stick with it or leave or come up with a plan that's in between. 

I used some fun paper for the background. I've played with my gelli plate and I have my underpaper, but I've also played with the backside of patterned paper.  Sometimes you get a patterned paper and then later on, you're asking yourself, why did I get this?  Well I took those, flipped some over that were white on the back, and played with my supplies.


The background combines several of my stencils, including an alphabet and circles stencil from Dylusions and a stencil designed by Ronda Palazzari for The Crafter's Workshop called Subway.  Looking through my stash, I found a stamped image of the ladybug woman's head from a Dylusions set I have that I had colored with my Tombow markers.


I added a banner die-cut from my stash and colored in the silver part with my Sharpie yellow paint marker.  Sharpie makes oil-based and water-based paint markers.  My paint marker is water-based, which seem difficult to find.  There is this set, which includes yellow.  And it has several colors to play around with, so it's a great find.


I added some letters stickers, and a phrase sticker from my stash, as well as stamped "excuses" with a mini alphabet stamp set using my Ranger Archival Ink in black.  I also used my Sharpie pen to do some doodles. 


Along the same vein as not quitting, I have a quick question for you.  You could use some extra money, right?  Who couldn't, of course.  I'm certainly no different, and I was in a real bind.  I work a day job, like many of you, and I was struggling.  Crafting takes money, and so does life.  And I thought about and pursued a few different options.  Then, I was having a conversation with a friend, about struggling financially, trying side jobs, and trying to find something that would stick long term.  I wasn't looking to make millions, just a little something extra so I can breathe a little very month.  One thing led to another and I want to share my good fortune with you!

So to help me continue my crafting and have a little wiggle room every month, I have a couple side hustles.  One is very simple, no tech skills required, and takes about 10 minutes a day.  It's an e-mail marketing system called Cliqly and it's a great!  Perfect for those short on time, which is all of us.  It's all set up, and you get your own referral link to up those commissions!  You don't have to bug family and friends, and you also start with a list, so no starting from scratch.  Don't waste another second if you're interested.

I've also included affiliate links for the products I've used.  I earn a commission for any purchases you make, with no price increase for you.  I truly appreciate the support! 

I'm also entering this in Simon Says Stamp's Wednesday Challenge.

Thank you so much for stopping by and checking out my art journal page.  Bye for now!


Monday, September 4, 2023

Mini Art Journal Day 8

Hi there, friends!

I'm working to catch up with posting the pages from my mini art journal for the Art Marks Challenge from Rae Missigman and Sandi Keene.

Day 8 - Attention


For some Art Marks Challenge history, you can click here.  And Rae's Instagram account here shows Rae's interpretation of the prompts.  For those joining us, I'm working in a mini art journal I made out of envelopes, a hole punch, and some baker's twine.

I'm going to be posting all my pages.  Some may be in groups, or individual pages, but I will post them all.  I also took apart my journal to make it easier to photograph, so you may see peeks from other pages.

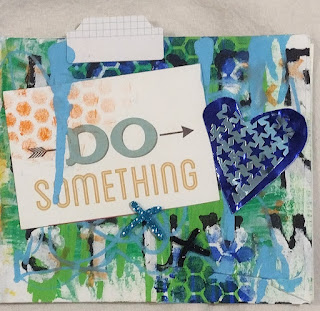
For Day 8, the prompt is Attention.  All of these prompts have been giving me a pause to think.  Attention is certainly one that calls to one, right?  What gets your attention?  What needs your attention?  Is there something in life you've been neglecting?  Your art, your health, your peace of mind?  I want to make sure I do things.  Not just give them attention in my mind, but actually do them.  Whether it's getting out more, giving attention to my art, my family, all the things that are important to me.


I made the background in several layers.  There was already some paint on it, so I used blue paint with a stencil from The Crafter's Workshop for the honeycomb pattern.  The stencil is 6x6 and has three side-by-side sections: stars, circles, and hexagons (honeycomb).  Then I grabbed a stencil I used on a previous page.  It's an alphabet stencil that reminds me of school art supplies.  It's made of that thick, transparent plastic that many school supplies seem to be made of so they can handle a lot of wear and tear.


First I used black paint, then offset the stencil a little and added white.  I adhered the large journal card and used some orange paint through the same pattern stencil and used little x or plus sign stamps from a Balzer Designs stamp set with some orange dye ink. 


The paint drips were made using a Moodclue chalk marker.  Here is a basic set.  Since these are chalk markers they have a matte finish, as opposed to glossy.  I pressed the tip to the spot I wanted until the paint pooled, then helped the paint drip down.

The tab at the top, two sparkly x's, and the heart are from my stash.  It's some packaging I had lying around that I cut a heart out of, and then did the same to some punchinella.


To help me continue my crafting, I have side hustles going.  One is a very simple, no tech skills required, and takes about 10 minutes a day.  It's an e-mail marketing system called Cliqly.  It's set up for you so all you have to do is send e-mail and watch the click and referral commissions come in.  It does take time, but you get your own referral link to use with all your e-mails.  You can also post it on social media.  As I said, very simple and takes very little time.  We could all use a little more of that.  I wouldn't waste another second if you're interested.  I've also included affiliate links for the products I've used.  I earn a commission for any purchases you make, with no price increase for you.  I truly appreciate the support! 

Thank you so much for coming and checking out my art journal page.  Bye for now!


Thursday, August 31, 2023

Mini Art Journal Day 6

Hey there my crafty friends!  Thanks for coming to see me today!

I have yet another page in my mini art journal for the Art Marks Challenge from Rae Missigman and Sandi Keene.

Day 6 - Envision

Crazy is Our Fame August Challenge

For some Art Marks Challenge history, you can click here.  And Rae's Instagram account here shows what's she's making for each prompt.  For those just tuning in, I'm working in a mini art journal I made out of envelopes, a hole punch and some baker's twine.

I'm planning to post all of my pages.  Some will be individual, some may be in groups of two or more.

Today's prompt was Envision, which is an strong concept.  How do you envision yourself?  What do you envision for yourself?  Perhaps being with family, maybe exploring a new hobby, could also be a focus on your health.  Envisioning yourself, regardless of what it is, should be positive.  Even if you want to, say, lose some weight or work on a better diet, it's still seeing yourself as being healthier.  I envision a transformation of sorts for myself.  Transforming into my improved self.  Healthier, happier, around family, and contributing to a better world.

Seeing yourself as happier can take many forms.  Happiness itself can take many forms, but it can include not struggling as much.  I imagine all of you struggle in one way or another.  Do you struggle financially?  I'm thinking for many of you that's a resounding yes.

For those it does resonate with, I want to share something with you.  It's a great way to earn some extra cash, though it does take time.  It's not a get rich quick scheme, which usually end up with you losing the money just as fast as you made it or faster.  No thank you.  This is a super simple, no tech skills needed, e-mail system that's already set up for you.  It's so easy; it's called Cliqly.  When you sign up, you get a referral link.  With the system, you earn money two ways: clicks and referrals.  You take 10 minutes, and send e-mails.  You can include your referral link in the e-mails.  And you're automatically given a list of subscribers.  The hard work is done for you.  It can grow slow or fast, depending on how much you do it and other factors.  I wouldn't waste another second if you're interested.  I'm not messing around, at least not when it comes to this.  I mess around with art, not making money.

I also share links as an Amazon Affiliate to products I like and want you to be able to get to make the fabulous artwork I know is in you to create.  Just follow the links, make a purchase, I get a commission, your price stays the same.


For this spread, I already had some green paint on it, so I worked around it.  The background is two of my Sakura solid paint markers, in yellow and neon orange.  These come in many different colors, including black and white.  I discovered them years ago and love them for adding paint fast that dries fast too.


Then I added black paint through a stencil from The Crafter's Workshop called Stripes Explosion.  The butterfly is from a stamp set called Butterflies.  It was designed by Balzer Designs and released by the company Impressions Obsession.  I stamped the butterfly onto smooth white cardstock, cut it out and glued it so it could fold over and the journal  can still close.  I also added an image in two parts.  Part magazine cutout, part digi image.


The purple panda face is a digi image from Oddball Art that I colored with colored pencils and Tombow markers.  I really love Oddball Art for its quirky, and sometimes sarcastic, images.  Definitely weird, sometimes sweet, sometimes edgy, but always enjoyable.  The Tombow markers are such a delight to use.  They're watercolor, dual-tip, and have a variety of rich colors.  Since they're watercolor, you can add water and spread the color around.  It's lovely!  And the fine point and brush tip works no matter what you're doing.


I then grabbed a face from a magazine and used a paint marker to add color to her hair.  I also used one of my Studio G mini alphabet stamp sets for the word "envision."  Then I had some doodle fun with my Uni Posca white paint marker and my Sharpie pen.

Thank you so much for stopping by and checking out my art journal page.  Bye for now.


Saturday, August 19, 2023

Collage This!

Sometimes I find it hard to get out my own head.  Creating has a few rules in a sense.  Like if you want something to stick to a page, something to hold it there.  Maybe adhesive on the back, wet paint, or a handy dab of glue.  But when it comes to other things, like ideas, there really aren't rules.  Sometimes I get stuck on what I think it should be, then I see something and realize, I gotta get outta the box!

That's just what I did with my entry for the More Than Words August challenge - Collage or College!

A couple quick notes before we get too far into our artsy playdate.  We all know we need to make a little extra money, right?  I do this in two ways: being an Amazon affiliate and the Cliqly e-mail system.  When you follow the links to Amazon and make a purchase, I make a commission.  It's helpful for me to continue making the lovely art that I hope you enjoy.  The e-mail system is a super simple way to make money online when you don't have a lot of time.  I mean ten minutes, and most people have ten minutes.  Everything is set up, you log in, send e-mails that are already written, and watch commissions roll in.  You even get your own referral link to include in the e-mails to get referral commissions too.  And yes, it's absolutely for real and super easy to do to bring in some nice extra money.  Who couldn't use that?

Now onto the show!


This art journal page got me rethinking how I could do something.  I really wanted wings, and was trying to figure out how to do that.  I thought of a few different ways: drawing, stamping, using paint or some other media to draw wings on.  Then I changed my thinking and grabbed my die-cut stash.  Bingo!  I grabbed word die-cuts that were similar in color, not necessarily white, cut them up in different sizes, and crafted my wings.  Then I used some white paint and my white-out pen to give a little uniformity and shape as well as add details, and I had my wings!


My background was already started a bit with bits of paint everywhere.  I added quite a bit of stenciling, one of my favorite techniques.  Some of my stencils are older and hard to find.  For this page I used StencilGirl Scribble Scratch Stencil by Carolyn Dube, similar to this one by The Crafter's Workshop and  Traci Bautista's Circles Circles Stencil with Artist Loft Red Paint.


 I also used this chevron stencil from The Crafter's Workshop with Liquitex Basics Yellow Paint.


I also used an older Dylusions alpha stamp set for "no", a mini alpha stamp set for "ON," Dylusions Bordering on the Edge stamp set for a border, and an acrylic stamp set from Studio Calico (I think) for the stars.


I also used magazine cutouts, since this IS supposed to be collage.  I used a set of legs from a Dylusions stamp set called Mini Moo and outlined the word "ON" with a Uni Posca Ultra Fine Point Red Paint Marker.


I'm also submitting this to the Simon Says Stamp Monday Challenge - Use Your Favorite Technique.

Busy, busy, busy...

I am so sorry I have been absent without a word.  Life can definitely get busy and sometimes unexpected events lead to adjustments. I will b...