Sunday, October 29, 2023

Join Me for Day 27

Hello everyone!  Thank you for joining me, I'm so happy to see you!  Life has been busy to say the least, but I'm working to share my last three pages of my Art Marks Challenge mini art journal, that was done back in September by Rae Missigman and Sandi Keene.

Day 27 - Rest


I'm also entering the following challenges:

A Place to Start Challenge


For some Art Marks Challenge history, you can click here.  And Rae's Instagram account here shows what she made for each prompt. I made a little art journal out of envelopes and baker's twine.  Simple but effective.  Though what Rae did with her pages was amazing, while also being simple.  She has this chunky journal with a fabric cover and she used tape to add her challenge pages to the existing journal.  Really amazing.  It reminds me to not stick to doing things only one way.  That there are always options when it comes to art.

How do you rest?  What does it mean to rest?  You can also be rest assured that you are doing the best that you can.  Sometimes that's not the usual path or sometimes some people are going to be completely against it, for any number of reasons.  However, self-confidence is important. 


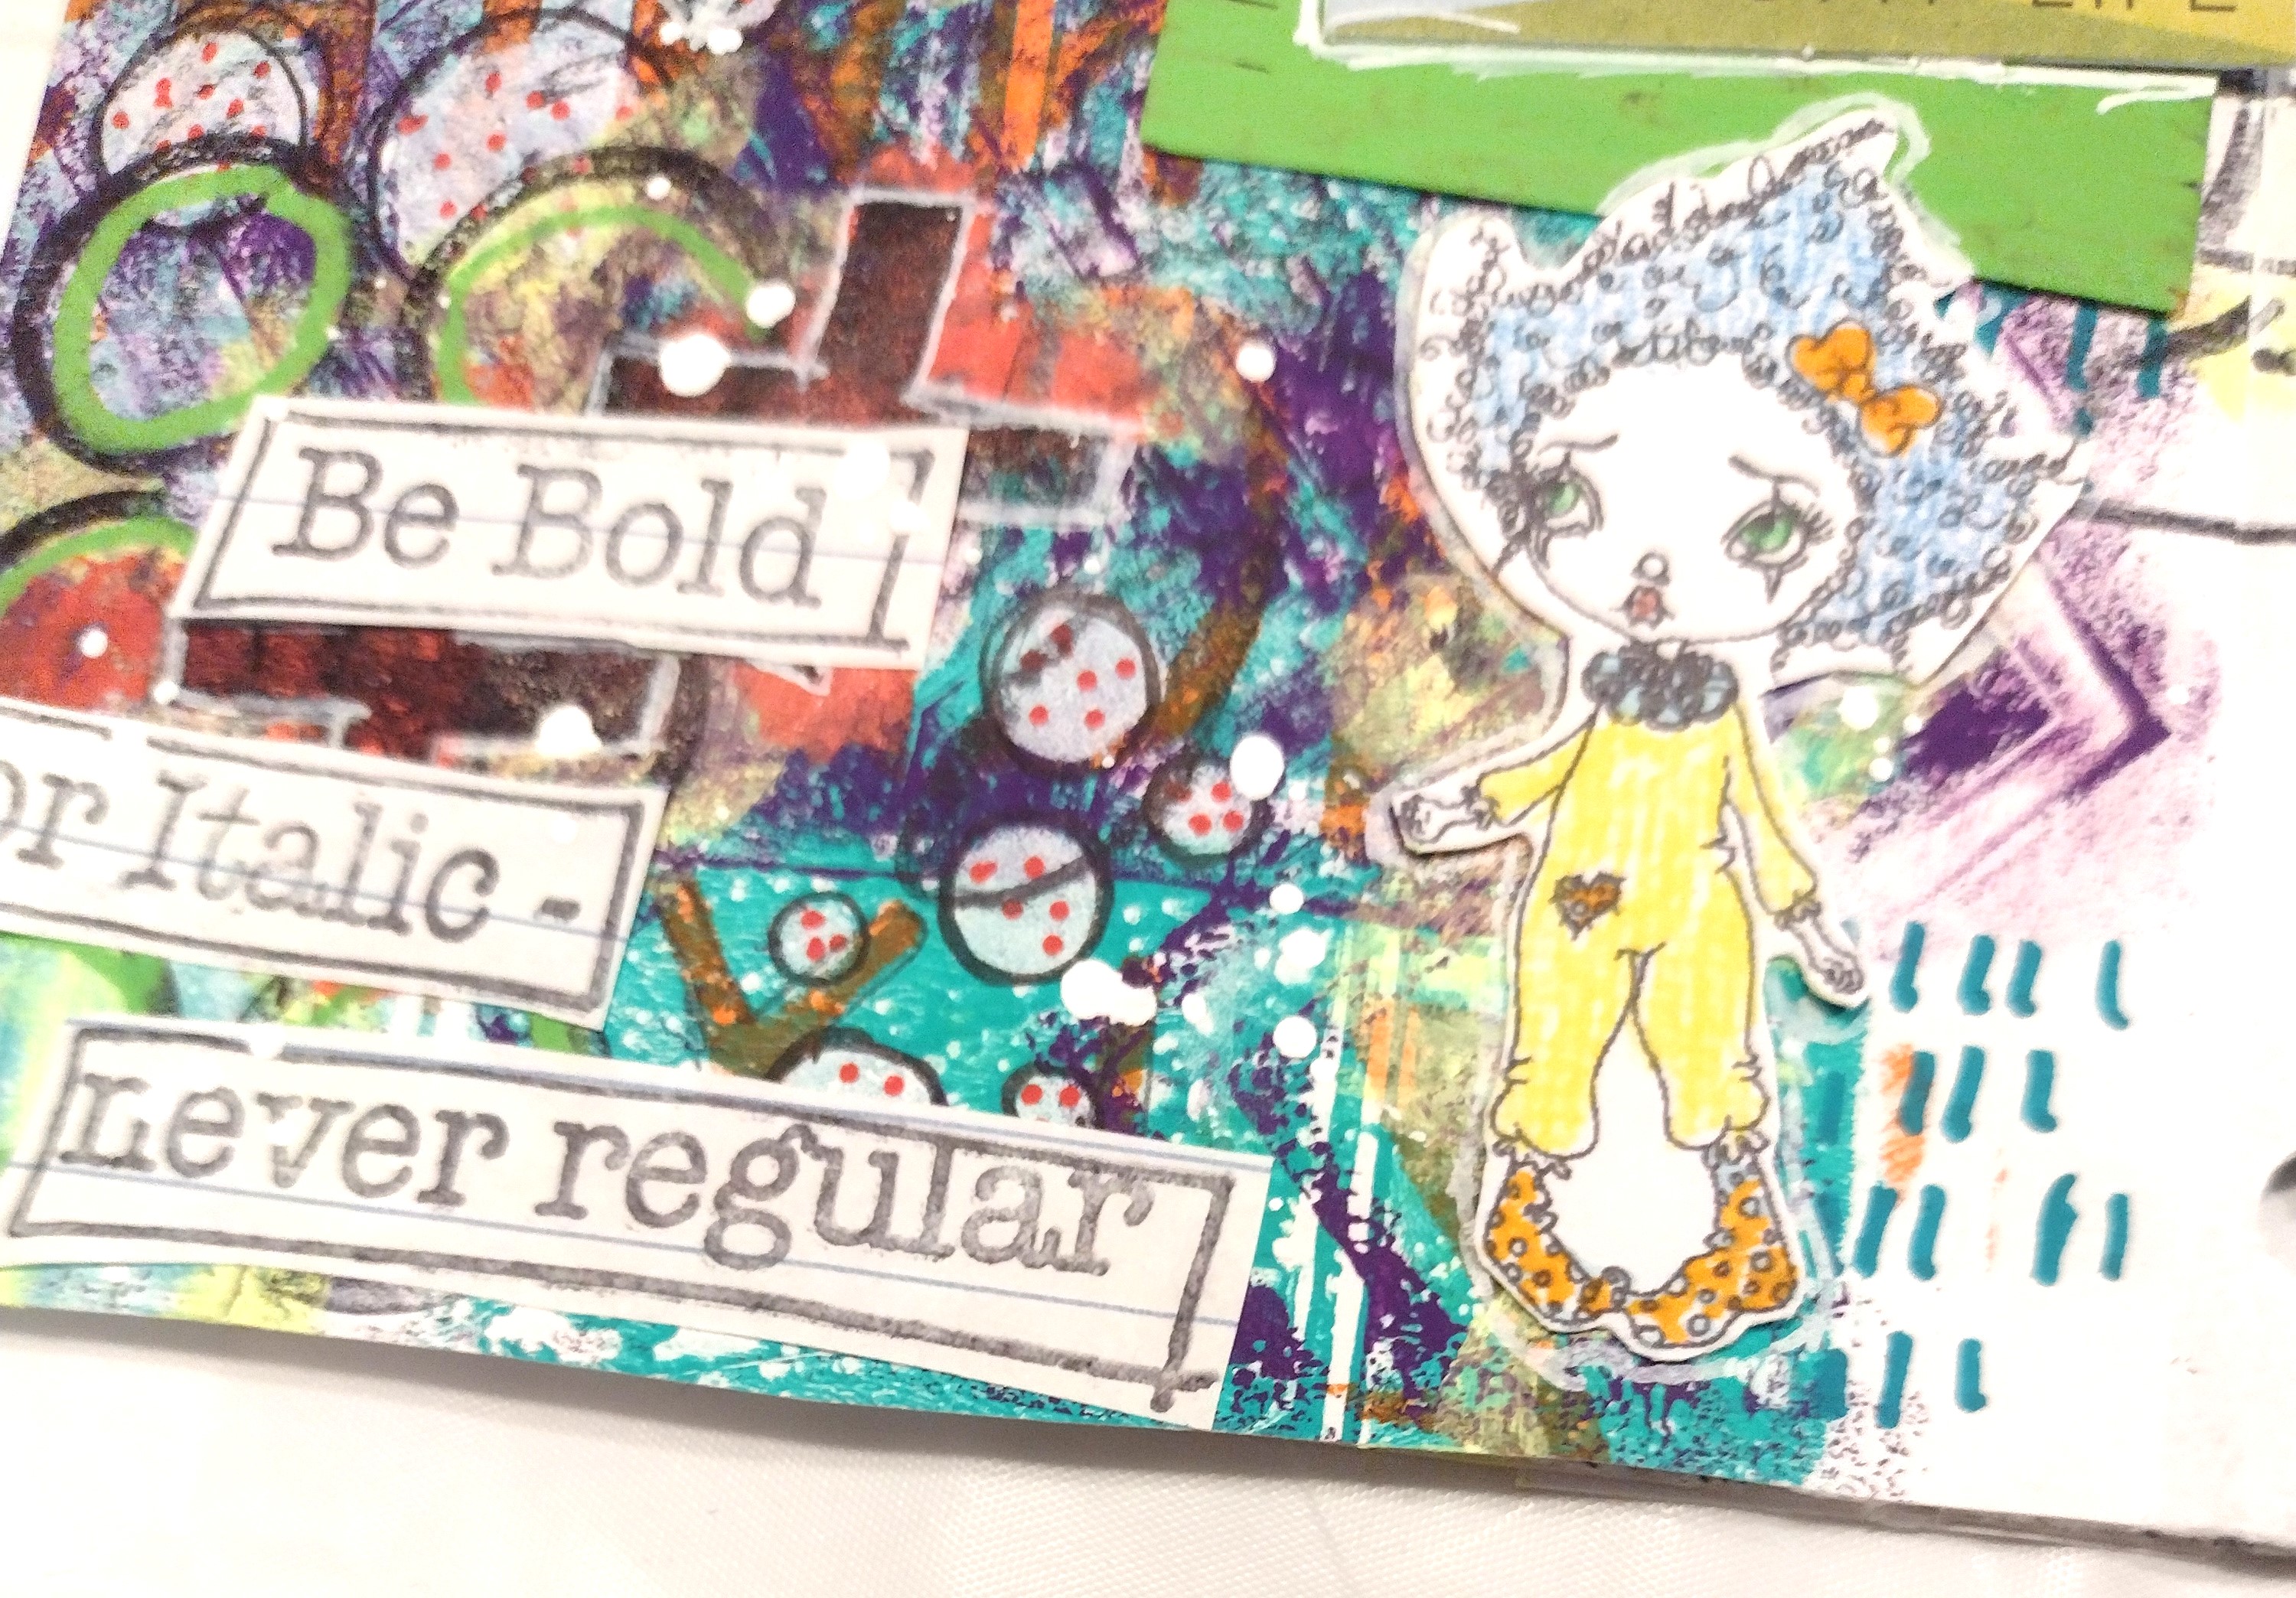
The background is a gelli print that I just went to town on.  I added doodling with paint markers.  I added stamping.  I used a Sharpie to outline some of the stenciling.  I added some digi images from Oddball Art and Octopode Factory that I colored with Tombow markers and colored pencils.  I added digi images from Octopode Factory and Oddball Art and a sentiment from Dylusions.  I also used my a white paint marker for lots of splatter.  I pressed the tip against my work surface to get the paint to pool, then tapped the marker with the extra paint to get the splatters.  I also added a clear tag that I used a paint marker to cover the bottom design because it didn't work for me and then added a die-cut from my stash and outlined it with white paint marker.


Thank you so much for coming by and I hope you enjoyed this art journal page.  Bye for now

Friday, October 27, 2023

Wednesday, October 25, 2023

Fun in My Art Journal on Day 25

Have you ever lost track of time?  Or lost track of days on the calendar?  Yup, I have so been there!  With all that we have going on in life, between marriage, kids, work, life in general?  Sometimes it's a wonder I get anything done, know what I mean?  I try to keep track of everything.  Reminders, lists, notes.  It can certainly be a lot.  And so it was that I discovered I had I completely overlooked this page from my previous sneak peek.  Whoops!

I'm backtracking and showing off Day 25 in my mini art journal that I made for the September Art Marks Challenge from Rae Missigman and Sandi Keene.  I'm in the home stretch and I think you'll really like the rest.

Day 25 - Root


I'm also entering the following challenges:

A Place to Start Challenge


For some Art Marks Challenge history, you can click here.  And Rae's Instagram account here shows what she made for each prompt. I made a little art journal out of envelopes and baker's twine.  Simple but effective.  Though what Rae did with her pages was amazing, while also being simple.  She has this chunky journal with a fabric cover and she used tape to add her challenge pages to the existing journal.  Really amazing.  It reminds me to not stick to doing things only one way.  That there are always options when it comes to art.

Root can mean a lot of things.  Putting down roots usually means one's life is becoming more stable, like buying a house or perhaps someone getting married, even having a child.  It's usually a cause for celebration in some respect.  Putting down roots is something to feel good about, if not a bit nervous.  You can also root for something.  Maybe you're cheering someone on in a new endeavor.  Or patting yourself on the back for a positive change in your life.  Everyone needs a cheerleader.  It can help calm your nerves from a big event.  Sometimes even something that is not huge in the grand scheme, but big for you or someone you know, such as a big test or a personal milestone.  I find myself rooting for myself because as I said, everyone needs a cheerleader to help accomplish goals and celebrate when those goals are accomplished.


I started this page with underpaper and pretty much kept the background as is.  Using several different colors of paint and a few stencils, including Dylusions Stars stencil, I kept the white space already existing on this page.  Now I'll be the first to say I love layers, different colors, and getting texture going.  But I do try to experiment and step outside the box every so often.  Though funny enough I also have a box on this page, compliments of a rubber and wood stamp I have from Amy Tangerine.  I don't even remember where I got it.  I believe it was a set.  The wood is a big thick block with good old-fashioned rubber attached to give the image.  In this case, the frame.


Using a digi stamp from Oddball Art, I colored it with colored pencils and pulled a die-cut from my stash.  And used my Sharpie pen and Uni Posca white paint marker for doodles.  I really like my white pant marker.  Its solid and has a fine point tip, which allows for different types of markings, both thick and thin.  It can be hard to find nice white markers, especially because the tips can end up absorbing some of the color you writing or doodling over.  This marker creates lots of possibilities for using them in your art.


A lot of my paint comes from here.  There's so many luscious varieties to choose from and allow for layering without making mud.


Thank you so much for coming by and I hope you enjoyed this art journal page.  Bye for now!


Friday, October 20, 2023

Join Me for Day 26!


Well hello!  For those who saw my sneak peek, earlier, welcome back.  If not, you're still in a for a treat!

Today I'm sharing the next page in my mini art journal for the September Art Marks Challenge from Rae Missigman and Sandi Keene.

Day 26 - Replenish


I'm also entering the following challenges:

Creative Fingers Challenge #264


Crazy is Our Fame Challenge

For some Art Marks Challenge history, you can click here.  And Rae's Instagram account here shows what she made for each prompt. I made a little art journal out of envelopes and baker's twine.  Simple but effective.  Though what Rae did with her pages was amazing, while also being simple.  She has this chunky journal with a fabric cover and she used tape to add her challenge pages to the existing journal.  Really amazing.  It reminds me to not stick to doing things only one way.  That there are always options when it comes to art.


To replenish usually means to refill, in a sense.  However, sometimes, if you take a break to replenish, you actually change something.  Taking time to replenish also is a time for introspection.  Sometimes that involves change.  You realize as you're refilling the tank, that you need to make changes to refill the tank.  What do you need to replenish?  How do you do it?  Have you ever taken time away to refill your tank and realized you needed to make changes in order to do that?  Or to make your refill last longer?


Sometimes I get intimidated by a blank page, and sometimes I get intimidated by a page filled with color and marks.  The background for this page is a small section of underpaper.  I really liked what was on the paper, but I still struggled.  I wanted to keep certain parts but I wasn't sure how.  So I decided to cover it up a bit and then add to it.  I first used a scribble stencil with some black paint.  And I thought about how while replenishing my energy, I've realized I've had to make changes.  I grabbed a couple die-cuts that were in that vein, and then used some card packing I had saved with the graph paper design and cut a scalloped border to go along the bottom, outlining it with my orange Uni Posca paint marker.


The fairy and the heart are digi stamps, from Oddball Art and Octopode Factory respectively, and colored with Tombow markers and colored pencils.  Then I used my Sakura Solid white paint marker and emerald green Uni Posca paint marker to make my top scalloped border.  I use paint markers a lot, and while I could use regular paint and a think paintbrush, a paint marker with a fine point works much better, especially if you're in a situation where you can't have the extra supplies.  It also helps with doodles.  It's much easier to doodle with a paint marker because it's like a pen.  So I have several paint markers from a few different brands.  Although not all paint markers are the same.  Some paint markers have different tips, so it is important to consider what you want to do with the paint markers.


In general, getting my paint from here works out very well for me.  Even the store brand is good quality.  Sometime you have to do a couple layers to get a good coat, but it all depends on how opaque you want the paint layer.  I find that sometimes I like the thinner layer so the underneath layers peek through.  That gives my art texture and dimension, which I love.


Thank you so much for coming by and I hope you enjoyed this art journal page.  Bye for now!


Thursday, October 19, 2023

Sneak Peek Time

 Please enjoy this sneak peek and tune in later to see more!  Enjoy and see you soon!


Thanks for visiting!  You're not going to want to miss this.  Bye for now!

Tuesday, October 17, 2023

Join Me for Mini Art Journal Day 24

Hello there my crafty friends!  Thank you so much for stopping by and I hope you enjoy the next page of my Art Marks Challenge art journal.  The Art Marks Challenge from Rae Missigman and Sandi Keene is technically over, but I was delayed, so I'm sharing my journal pages a bit after the fact.

Day 24 - Build


I'm also entering my page into the following challenges:

Lil Patch of Crafty Friends Challenge

The Crafty Addicts Challenge


For some Art Marks Challenge history, you can click here.  And Rae's Instagram account here shows what she made for each prompt.  For those who haven't seen my previous posts yet, I'm working in a mini art journal I made out of envelopes, but you can use different whatever materials you have on hand, including scrap or underpaper.  That can result in some pages already having stuff on them.  A hole punch and some baker's twine later and a mini art journal for the challenge ready for art!

Different challenges cause a person to think and possible create art, a certain way.  What I love about art journaling is it allows for whatever level of art.  Depending on why you keep an art journal, your deepest thoughts can make it onto a page.  Sometimes a good brain dump on your art journal page is just what you need.  Whether it's actual writing that you incorporate, writing and your art covers it up, or the art itself represents the brain dump.

For this one, Build was a tough one.  Questons like what do I want to build?  Can I build on something that already existing?  In general, I'd rather build something up then tear something down.


My background is a part of a gelli print.  I used several stencils, including Tim Holtz Patchwork Circle.  I then used a large arrow stencil with Ranger Archival black ink


I added a few die-cuts from my stash and doodles with my Sharpie pen and my Uni Posca water-based white paint marker.  I also added one of my favorite things in art, ink drips.  These were made with Liquitex Liquid Ink in Yellow Medium Azo.  To do the drips, I put the tip right along the edge of the paper and tap the paper to get the ink to roll down.  Then came the hardest part: waiting for things to dry.

But waiting is worth it.  It allowed me to build up the page without sacrificing what I wanted to do.  And in general art journaling and mixed media is all about communication.

Thank you so much for stopping by and checking out my art journal page.  Bye for now!


Monday, October 16, 2023

Join Me for Day 23

I'm so glad you're back!  I'm sharing Day 23 of my mini art journal for the Art Marks Challenge that was hosted by Rae Missigman and Sandi Keene.  The challenge already ended, but I'm still catching up.  So today I'm sharing my page for the prompt Invent.

Day 23 - Invent


I'm also entering Simon Says Stamp's Monday Challenge.

For some Art Marks Challenge history, you can click here.  And Rae's Instagram account here shows Rae's interpretation of the prompts.  Rae made tiny cards and put them into this gorgeous little pocket journal, which is super thick.  I think it has fabric covers as well.  Swoon!  I love chunky journals and textures

 So for the prompt Invent, I remembered when I had been playing with gelli prints, I had used a small stencil from Balzer Designs that's a light bulb.  It's blurry, but I like how it turned out.  And I knew it was perfect for this prompt.  I was also thinking about the process of inventing.  When you're inventing,you're usually writing and drawing.  So I used some patterned paper with words all over it and ran it through my Cuttlebug using Altenew's Flat and Fold Alphabet Dies.  I did some of the letters backwards, whoops!  Then I thought, when you're inventing, things happen.  So I kept the backwards letters.


I added a few die-cuts from my stash. I also used two paint markers, both Uni Posca, in white and emerald green.  Then I used my Liquitex Liquid Ink in Naphthol Crimson to make some lovely, funky drips!


 Thank you so much for stopping by and checking out my art journal page.  Bye for now!


Sunday, October 15, 2023

Mini Art Journal Day 22

Welcome back my friends!  I shared a sneak peek, and as promised, this post will have all the details and pictures!  I'm so glad you could join me today!

I'm sharing another page in my mini art journal for the Art Marks Challenge from Rae Missigman and Sandi Keene.

Day 22 - Less


I'm also entering my page into these challenges:

A Place to Start - October 2023

Creative Fingers #263


For some Art Marks Challenge history, you can click here.  And Rae's Instagram account here shows what's she's making for each prompt.  For those who haven't seen my previous posts yet, I'm working in a mini art journal I made out of envelopes, but you can use many different things, including scrap or underpaper, so some pages already had stuff on them.  A hole punch and some baker's twine later and a mini art journal for the challenge ready for art!

I've mostly posted individual pages.  This challenge has been very interesting thus far, because it makes you think.  Sometimes a good brain dump on your art journal page is just what you need.  Whether it's actual writing that you incorporate, writing that your art covers up, or the art itself represents the brain dump.

For this prompt, I had to really consider it, especially because I like putting more on my pages, not less.  However, there's more than one way to have less or be less.  I think it's more that some people need less self-doubt, less hurt, less being stuck.  So I think this page works well.


My page started as some mop up paint and and then I added part of a gelli print on deli paper to add more dimension.  One stencil I used on the gelli print is The Crafter's Workshop Pie Chart with green paint.  I added black paint from Artist's Loft through a Dylusions border stencil, and a eyeball flower digit stamp from Oddball Art.  

I also used the bigger plus signs/"X"'s from a Balzer Designs stamp set with Ranger Archival black ink, as well as a triangle stamp with ColorBox Blue Lagoon pigment ink.  You can also see where I added some doodles tracing the chevron part of the pie chart stencil with one of my favorite supplies, paint markers.  In this case, a Uni Posca paint marker in Emerald Green.  This paint marker is a weird one because the color doesn't look at all green, but it's still a wonderful color.


I also used my trusty Sharpie pen for some tracing and added my sentiment from a rubber stamp and the same Archival ink.  Here's a great place to get acrylic paint. There's several brands to choose from, the prices are reasonable, and they carry a huge number of colors and types of paint (like heavy body and free flow).

Thank you so much for stopping by and checking out my art journal page.  Bye for now!


Sneak peek

 My newest art journal page...come back soon for all the details!


Friday, October 13, 2023

Mini Art Journal Day 21

Oh hello!!  I'm so glad you chose to stop by today.  How are you, my friends?  I'm sharing the next page in my little art journal for the Art Marks Challenge from Rae Missigman and Sandi Keene.

Day 21 - Grace


I'm also entering my page into these challenges:

Crazy is our fame - October Challenge


To learn some Art Marks Challenge history, you can click here.  And Rae's Instagram account here shows what's she made for each prompt.  If you're just starting to read my blog, first of all, welcome!  For this challenge I made a little art journal out of envelopes and some baker's twine.  You can be as simple or as fancy as you like.   If you use paper that's from other projects, it just means those pages will already have leftover painting, stamping, or stamping.  That's makes a great jumping off point, for those who have difficulty with a blank page.  That's a difficulty I run into, staring at a blank page and wondering where to start.  It can be fun, but also a chance to overthink instead of getting something down and just playing.  

Some days about this challenge have been, dare I say, a challenge.  I've thought about all of them, but a few have given me real pause.  A good brain dump can be helpful, though whether it becomes part of your page or covered up.  There's no wrong answer


In thinking about grace, I thought about all the different meanings, and there's actually a lot.  I looked this one up in the dictionary, because I was curious.  One of several definitions speaks to showing kindness.  And I would love more kindness in the world.  I think we all need to show ourselves a little more kindness.  Not a blank check for excuses, but understanding that one person can only do so much.


My background is another section of gelli print and I went to town on this pages with the doodling, mostly, if not completely, with my amazing Uni Posca white paint marker.  I seriously love this paint marker.  Finding a good white paint marker can be difficult, but my Uni Posca stays opaque and looks just wonderful.


You can see I used my Dylusions Stars stencil, as well as another Dylusions stencil with large numbers.  There's also spots of other colors, including orange and green.  I really like getting my paint from here because there are several brands available including bargain brands.  And I've found that bargain brands work quite well when creating all my tags, cards, art journal pages, etc.  And even the brand name products are well-priced, so it's a great deal all around.


I used several different stencils, which is the fun of gelli printing!  You grab some paint, grab your stencils or stamps, and just play.  Twist the paper at weird angles for different designs.  Use colors together that would normally make mud.  The possibilities are endless!  I added a star digi stamp from Oddball Art colored with colored pencils.  The arrow is a die-cut from my stash that I altered with supplies from my stash, including Sakura Gelly Roll pens.  These pens, oh my gosh, can I tell you?  I love them!  The coverage is opaque and the colors are delicious.


I did also stamp a border stamp from my Dylusions Inbetweenies stamp set and Archival black ink.  Have I mentioned how much I love Dylusions?  They're just so snarky and fun!  Yes, I love a bunch of my supplies.  I can't help it.

Thank you so much for coming by and I hope you enjoyed this art journal page.  Bye for now!


Monday, October 9, 2023

Mini Art Journal Day 20

Hello there my crafty friends!  Thank you so much for stopping by and I hope you enjoy the next page of my Art Marks Challenge art journal.  The Art Marks Challenge from Rae Missigman and Sandi Keene is technically over, but I was delayed, so I'm sharing my journal pages a bit after the fact.

Day 20 - Learn


I'm also entering my page into the following challenge:

Creative Fingers Challenge #263


For some Art Marks Challenge history, you can click here.  And Rae's Instagram account here shows what she made for each prompt.  For those who haven't seen my previous posts yet, I'm working in a mini art journal I made out of envelopes, but you can use different materials, including scrap or underpaper, so some pages will already had stuff on them.  A hole punch and some baker's twine later and a mini art journal for the challenge ready for art!

This challenge has been very interesting, because it makes you think, which can be different for an art journal.  Depending on why you keep an art journal, your deepest thoughts can make it onto a page.  Sometimes a good brain dump on your art journal page is just what you need.  Whether it's actual writing that you incorporate, writing and your art covers it up, or the art itself represents the brain dump.

For this one, Learn seemed easy, but it wasn't exactly.   However, I think everyone knows the phrase you never stop learning.  I took my cue from that and incorporated learning into my at journal page.


My background is a gelli print, and I spy at least three different Dylusions stencils peeking out: in the border on the left, the arrows on the right from a shimmery spray, and there's also an alphabet stencil with Liquitex titanium white


The girl with a book is a digital image from Oddball Art, and I colored her with a combination of colored pencils and Tombow markers.  Then I used my Balzer Designs stamp set that includes stamps for every day of the week with the Archival black ink.


I added some stamped stars with the same black ink, along with other small stamps with Distress Ink in Ripe Persimmon and Cracked Pistachio, and traced both the arrow from the stencil and the stamped images with a Sharpie pen.  I also added details with my Uni Posca water-based white paint marker.


Thank you so much for stopping by and checking out my art journal page.  Bye for now!


Thursday, October 5, 2023

Let's Talk Organization...

...of your lovely craft supplies.  Everyone has their own method of doing this.  A lot of it depends on what space you have to store your supplies and what supplies you have.  I've seen pictures and been to some craft spaces that would make you swoon.  I've also seen or read about people who have a little corner or two to three foot space of their bedroom or living space.  I myself have a chaotic little two to three foot space that's at time fit to burst, but I make it work.


I do have a desk/table that I work at, but the above picture is not mine.  I do however have a container holding my brushes and palette knives.  As I've gone along with my art, I've discovered a couple things about organization: it's necessary and it's quite personal.

Necessary because even when, or perhaps especially if you have a small space,  knowing where your supplies are means you spend more time creating art and less time searching for things.  When inspiration strikes, you don't want to spend lots of time tracking down the supply needed to achieve whatever look you're going for.

And organization is personal because everyone's head works differently and it depends on what supplies you have.  Even a single product for organization, whether it's a shelving unit or handled container, four different artists will use those same products in very different ways.

This is not meant to overwhelm, but to have you look at the space you have to craft in and how your bring works.  For instance, markers.  You may work by color, so organizing your markers by color regardless of the brand, might work well for you.  Others prefer working with certain products at different times.  So similar products, such as tags, cards, and markers would be grouped together by how or hen they get used.

The same can be said for the products used to organize supplies.  I've seen everything from custom built wooden shelves, carts, and trays in a large, separate craft room all its own to a desk with drawers on top and maybe a woven bag to hold some extra items.


I myself do not have a craft room, but don't think it's not on my crafty wishlist.  My space has morphed and seems to have a few different methods.  Different methods can also be used at different stages.  You may try one method and find it doesn't work for you.

One things for me is seeing my supplies.  I love pretty boxes as much as the next gal, and I still have several because of their look, but also their crafty use.  One crafty organization method I have seen many an individual use is rolling carts.  And I finally got one for myself several years ago.  It's a lovely 3 tier rolling cart, similar to this one.  I'm not quite using all the little pieces that go along with it, but that is, again, a space issue.  But it has 3 levels, wheels, and it's a lovely aqua green color.  Many come in different shades, and can literally hold anything.  Even craft wise, shelves can hold anything from knitting and crochet supplies to using one shelf for a kit subscription so you can see everything to use it all.  Another item I got early on for organization is a plastic, three drawer rolling cart like this.  Mine is all purple, but the drawers are still translucent to you can see what's inside.  And that's changed too.  In trying to use the space wisely, one drawer has morphed several times to hold a bunch of supplies that also fit in each drawer.  One holds tools such as gluesticks for my glue gun, sandpaper, and decorative scissors.

There's lots of options, and it's all about finding what's right for you.  I'll revisit, but something to chew on for now.  Thanks for visiting!  Bye for now!

#craftorganization  #craftroom

Monday, October 2, 2023

Mini Art Journal Day 19

Hello my friends!  I'm so glad you could join me today!

I'm sharing another page in my mini art journal for the Art Marks Challenge from Rae Missigman and Sandi Keene.

Day 19 - Balance


I'm also entering my page into these challenges:

Simon Says Stamp's Monday Challenge


For some Art Marks Challenge history, you can click here.  And Rae's Instagram account here shows what's she's making for each prompt.  For those who haven't seen my previous posts yet, I'm working in a mini art journal I made out of envelopes, but you can use many different things, including scrap or underpaper, so some pages already had stuff on them.  A hole punch and some baker's twine later and a mini art journal for the challenge ready for art!

I've mostly posted individual pages, and I do plan to post them all.  This challenge has been very interesting thus far, because it makes you think.  Not that I mind thinking.  Sometimes a good brain dump on your art journal page is just what you need.  Whether it's actual writing that you incorporate, writing and your art covers it up, or the art itself represents the brain dump.

Life always seems to be a question of balance.  Balancing time, money, quality time spent with family and friends, your job, maybe getting back into shape or it could be as simply as remembering to laugh.  However you find balance, it's worth the search.  The added texture for my page is the star.  I use a lot of baby wipes in my art.  One of those essential supplies, in my opinion.  Among other uses, I clean my gelli plate and clear off my stamps when I am stamping paint.  Many time the colors don't bleed as much, even if they're not supposed to mix.  And sometimes a single color gets fades and such which look terrific when a shape is cut out after the wipe is dried.  The big star for this page is from just such a case.


My background is another gelli print on deli paper.  You can see one layer is red paint through The Crafter's Workshop Chevron stencil as well as aqua green through another stencil from The Crafter's Workshop called XOXO.


I also used a Dylusions stencil with some ultramarine paint and did a lot of doodling with my Uni Posca white paint marker.  I also used some die-cuts from my stash and used some little stamps sets from my stash as well.  A great place I get my paint is Dick Blick. There's several brands to choose from, as well as a huge number of colors and types of paint (like heavy body and free flow).


Thank you so much for stopping by and checking out my art journal page.  Bye for now!


Sunday, October 1, 2023

Mini Art Journal Day 18


Hi there my crafty friends!

I'm so glad you're visiting!  I have another page in my mini art journal for the Art Marks Challenge from Rae Missigman and Sandi Keene.

Day 18 - Tend


I'm also entering my page into these challenges:

Simon Says Stamp's Wednesday Challenge - Anything Goes


For some Art Marks Challenge history, you can click here.  And Rae's Instagram account here shows what's she's making for each prompt.  For those who haven't seen my previous posts yet, I'm working in a mini art journal I made out of envelopes.  You can use many different types of paper, including scrap or underpaper.  A hole punch and some baker's twine later and a mini art journal for the challenge ready for art!

I've mostly posted individual pages, and I do plan to post them all.  This challenge has been very interesting thus far, because it makes you think.  Not that I mind thinking.  Sometimes a good brain dump on your art journal page is just what you need.  Whether it's actual writing that you incorporate, writing and your art covers it up, or the art itself represents the brain dump.


When I saw the prompt, a lot of ideas swirled in my head.  What do you think of when you hear the word "tend."  Granted, the word tend has different meanings.  However my mind immediately went to the definition of caring for something.  You can tend your child(ren), a garden, a relative, or even yourself.  I've been doing a lot, in a sense trying to do everything, even though that's impossible.  So tending to myself can fall by the wayside.  And I think many people fall into that.  Everyone gets busy with life: work, kids, friends, taking care of the home, and I'm sure you can come up with many more.  Tending to yourself, caring for yourself, can get pushed the bottom of the priority list, which isn't good either.  So I need to tend to myself more.

My background is actually two layers of gelli prints.  One is on cardstock, the other is on deli paper.


I used a border stamp from Dylusions Inbetweenies stamp set, with Ranger Archival black ink, and  heart stamp with Ranger Distress Ink in Salty Ocean.  I know I've said it before, but I love my Ranger archival ink.  I really want it in more colors.  And there's lots!  Sometimes I don't mind the ink not being crisp or maybe spreayed with water and a tag dragged through it for a nice effect.  But the archival ink always give a crisp image and doesn't smear.  You can add any wet medium over it and it will stay put.


All the die-cuts are from my stash. I used a Sharpie pen and my Uni Posca white paint marker for the doodles.  I also used a red marker from my lovely Tombow markers to add some doodles to a die-cut.


Thank you so much for stopping by and checking out my art journal page.  Bye for now!

Busy, busy, busy...

I am so sorry I have been absent without a word.  Life can definitely get busy and sometimes unexpected events lead to adjustments. I will b...