Thursday, August 31, 2023

Mini Art Journal Day 6

Hey there my crafty friends!  Thanks for coming to see me today!

I have yet another page in my mini art journal for the Art Marks Challenge from Rae Missigman and Sandi Keene.

Day 6 - Envision

Crazy is Our Fame August Challenge

For some Art Marks Challenge history, you can click here.  And Rae's Instagram account here shows what's she's making for each prompt.  For those just tuning in, I'm working in a mini art journal I made out of envelopes, a hole punch and some baker's twine.

I'm planning to post all of my pages.  Some will be individual, some may be in groups of two or more.

Today's prompt was Envision, which is an strong concept.  How do you envision yourself?  What do you envision for yourself?  Perhaps being with family, maybe exploring a new hobby, could also be a focus on your health.  Envisioning yourself, regardless of what it is, should be positive.  Even if you want to, say, lose some weight or work on a better diet, it's still seeing yourself as being healthier.  I envision a transformation of sorts for myself.  Transforming into my improved self.  Healthier, happier, around family, and contributing to a better world.

Seeing yourself as happier can take many forms.  Happiness itself can take many forms, but it can include not struggling as much.  I imagine all of you struggle in one way or another.  Do you struggle financially?  I'm thinking for many of you that's a resounding yes.

For those it does resonate with, I want to share something with you.  It's a great way to earn some extra cash, though it does take time.  It's not a get rich quick scheme, which usually end up with you losing the money just as fast as you made it or faster.  No thank you.  This is a super simple, no tech skills needed, e-mail system that's already set up for you.  It's so easy; it's called Cliqly.  When you sign up, you get a referral link.  With the system, you earn money two ways: clicks and referrals.  You take 10 minutes, and send e-mails.  You can include your referral link in the e-mails.  And you're automatically given a list of subscribers.  The hard work is done for you.  It can grow slow or fast, depending on how much you do it and other factors.  I wouldn't waste another second if you're interested.  I'm not messing around, at least not when it comes to this.  I mess around with art, not making money.

I also share links as an Amazon Affiliate to products I like and want you to be able to get to make the fabulous artwork I know is in you to create.  Just follow the links, make a purchase, I get a commission, your price stays the same.


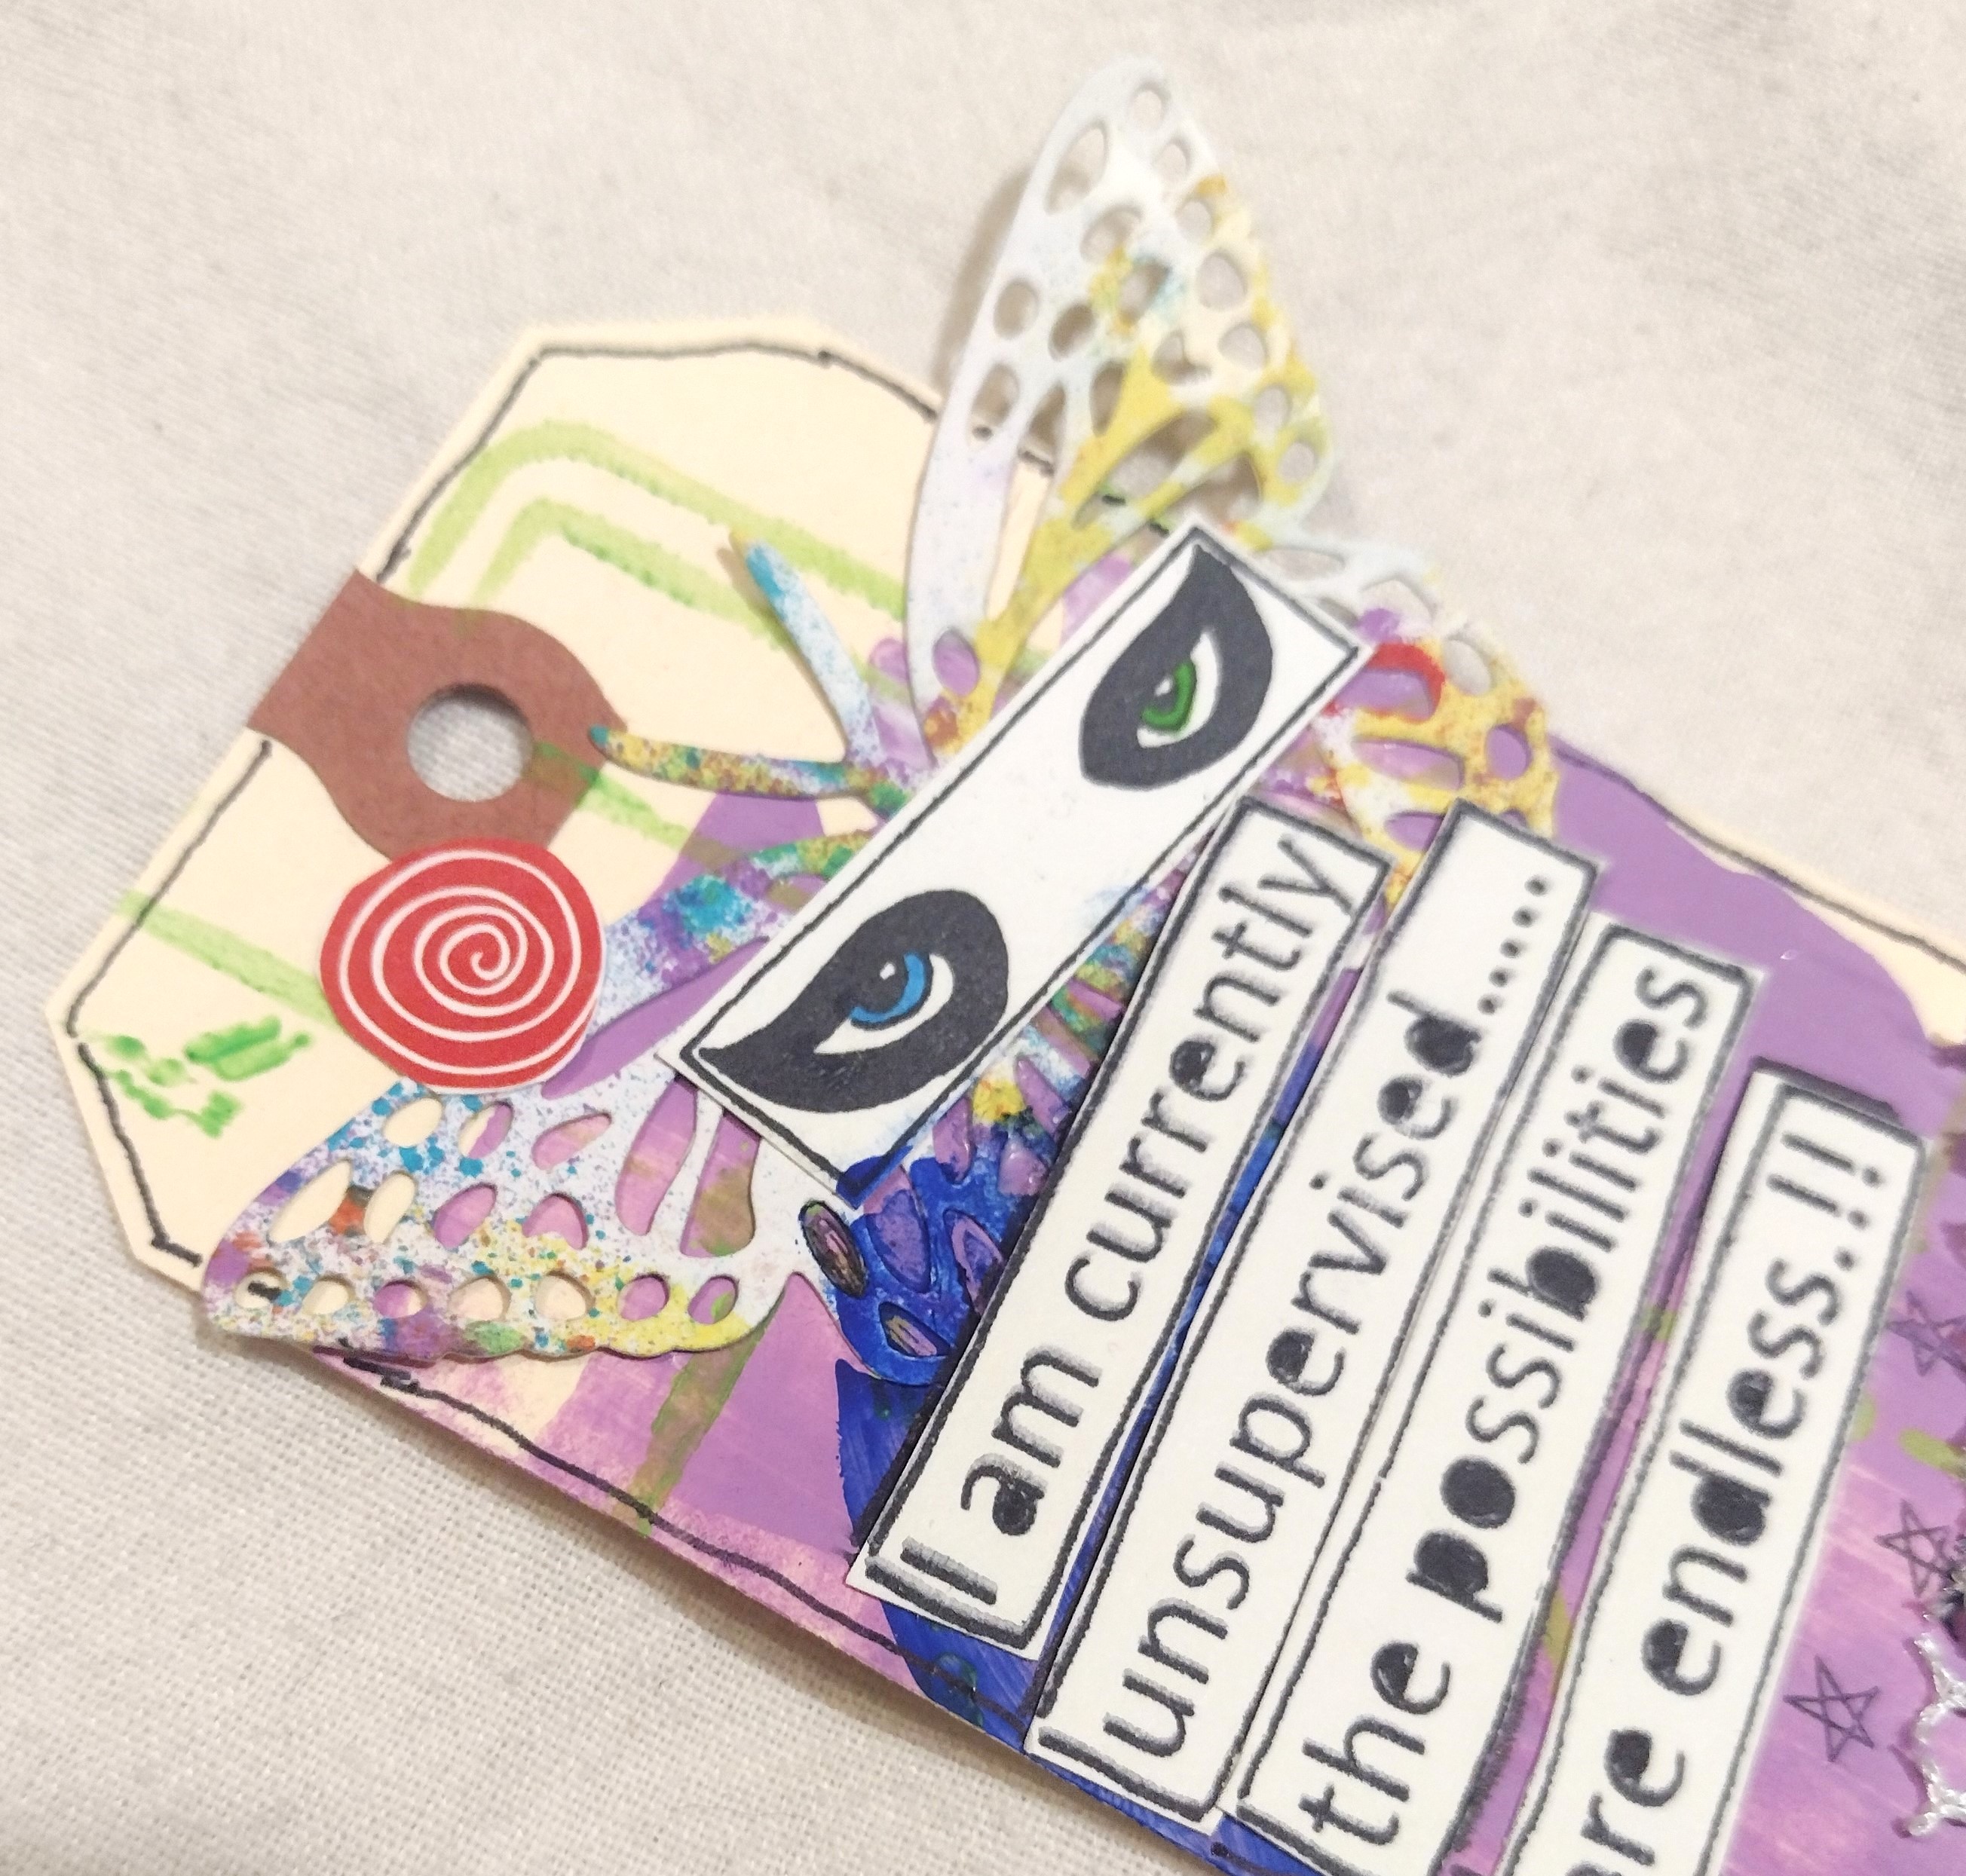
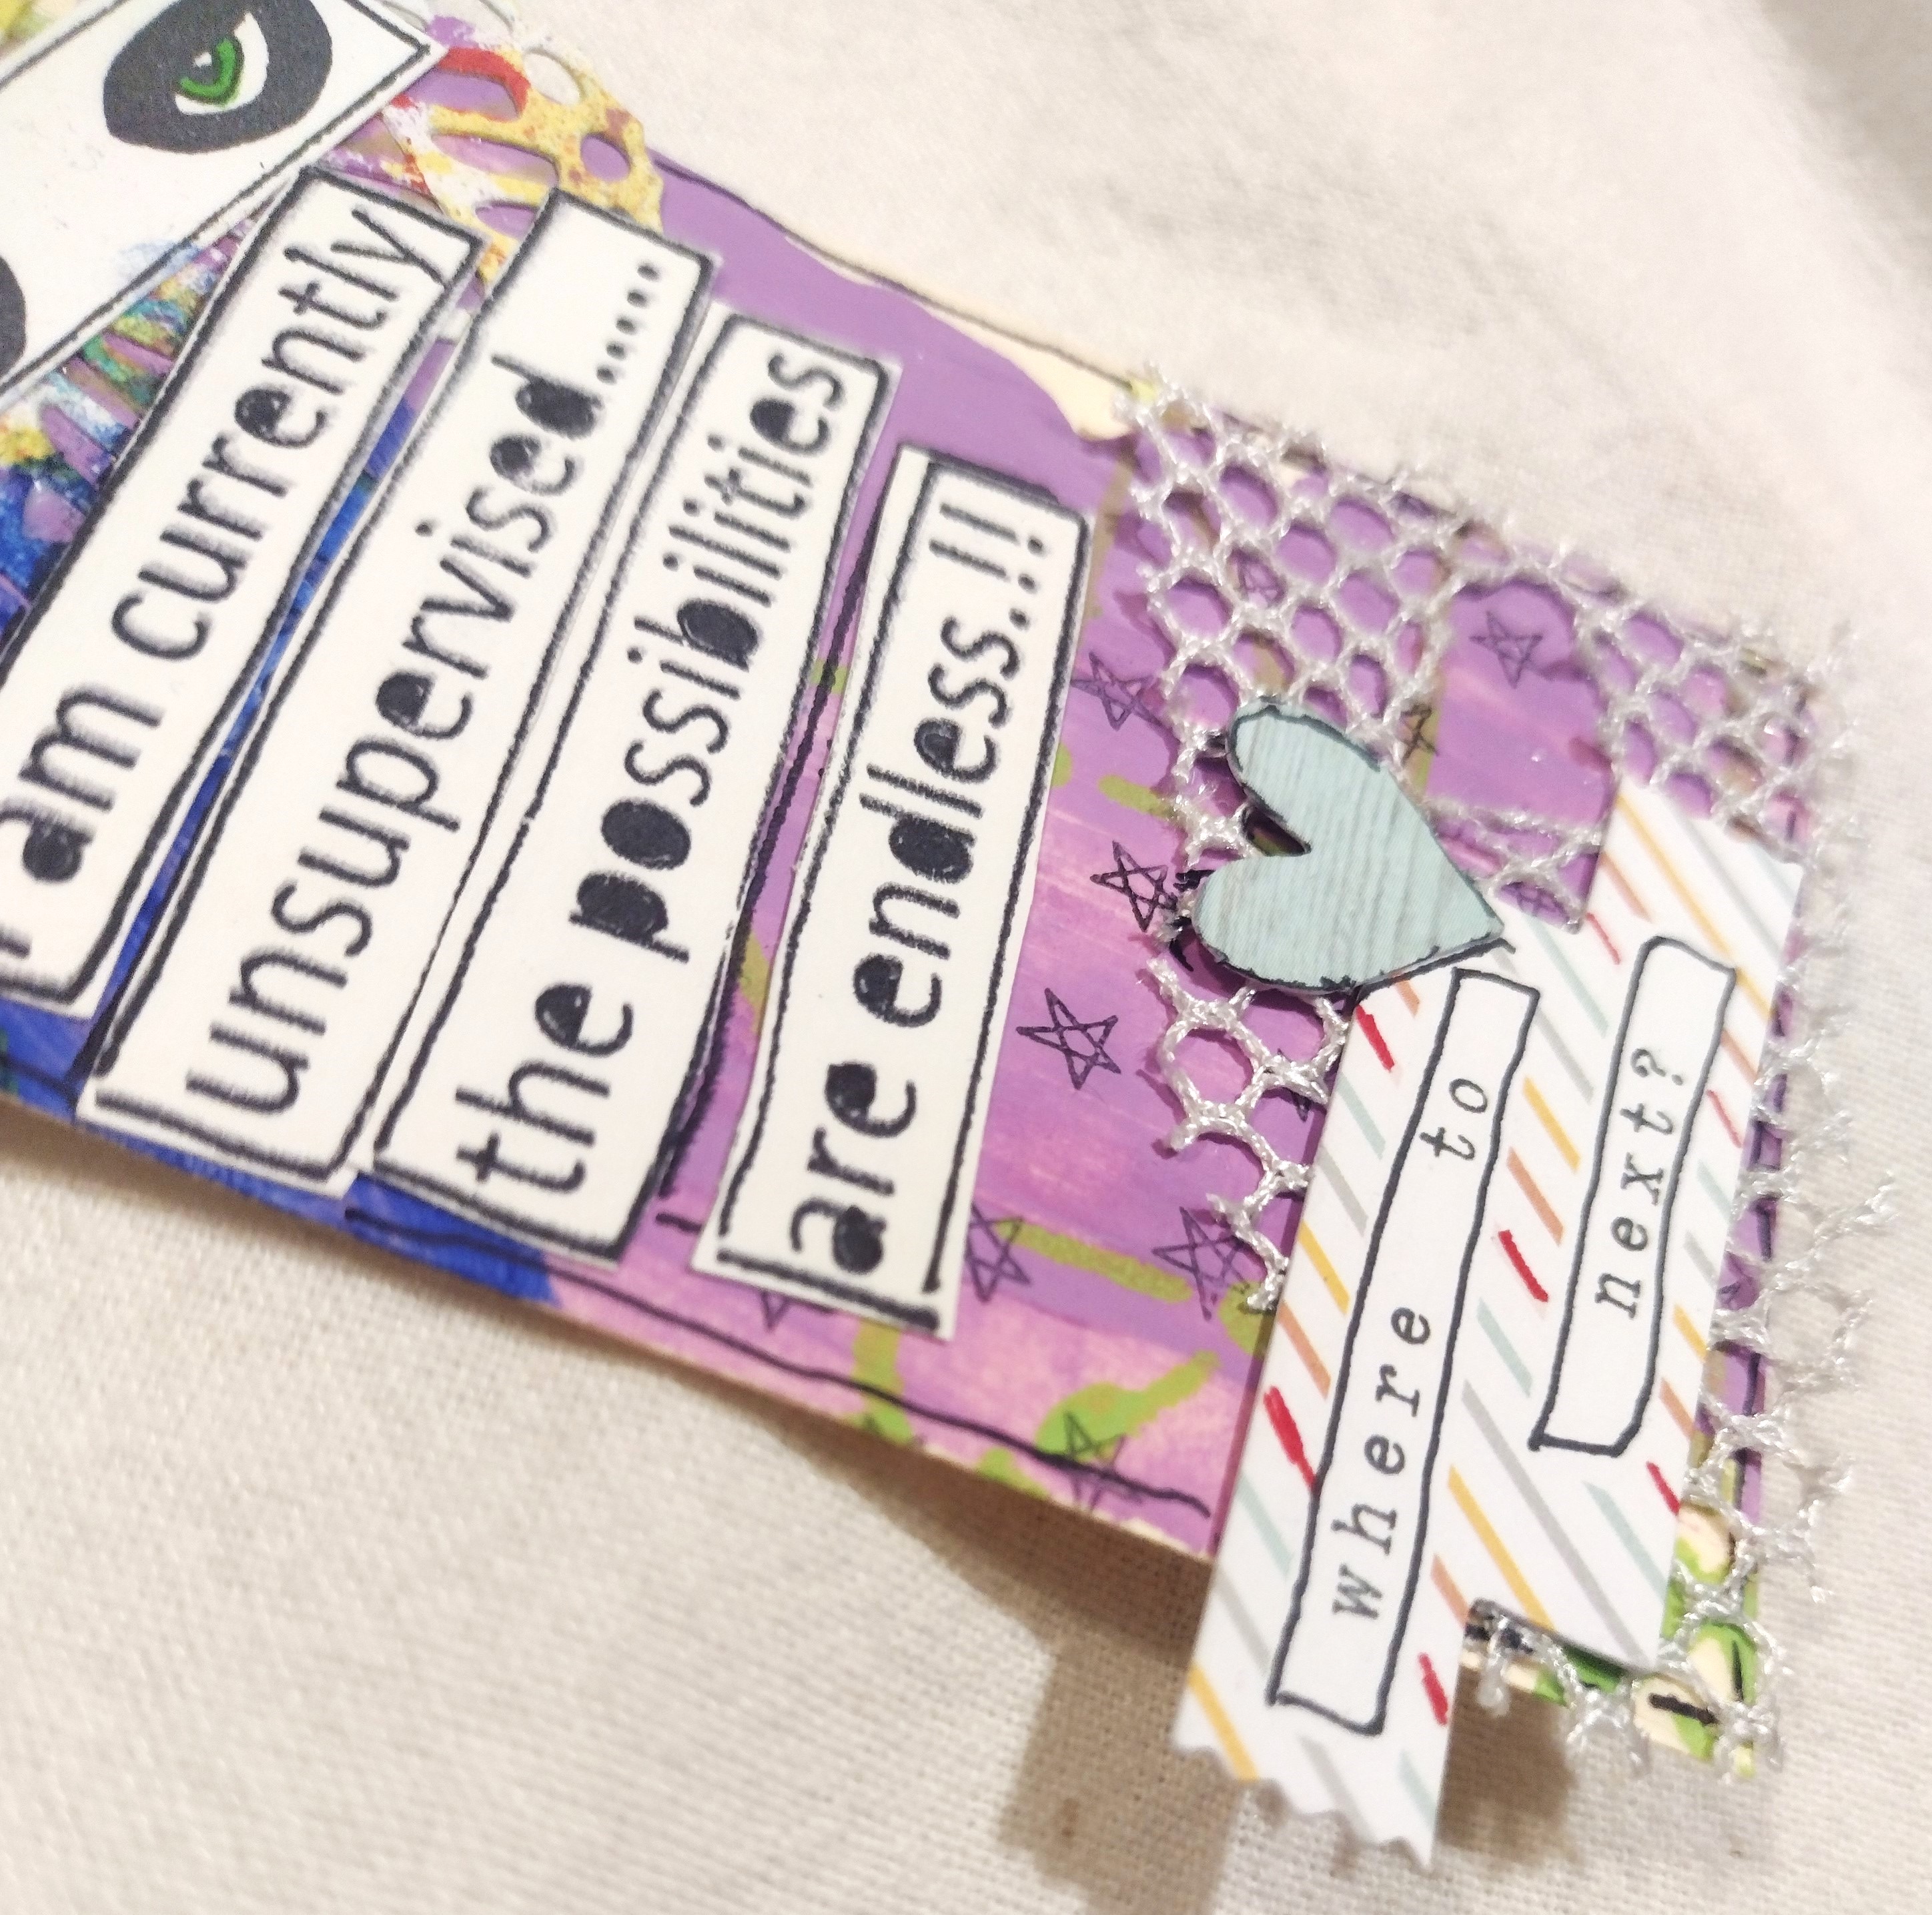
For this spread, I already had some green paint on it, so I worked around it.  The background is two of my Sakura solid paint markers, in yellow and neon orange.  These come in many different colors, including black and white.  I discovered them years ago and love them for adding paint fast that dries fast too.


Then I added black paint through a stencil from The Crafter's Workshop called Stripes Explosion.  The butterfly is from a stamp set called Butterflies.  It was designed by Balzer Designs and released by the company Impressions Obsession.  I stamped the butterfly onto smooth white cardstock, cut it out and glued it so it could fold over and the journal  can still close.  I also added an image in two parts.  Part magazine cutout, part digi image.


The purple panda face is a digi image from Oddball Art that I colored with colored pencils and Tombow markers.  I really love Oddball Art for its quirky, and sometimes sarcastic, images.  Definitely weird, sometimes sweet, sometimes edgy, but always enjoyable.  The Tombow markers are such a delight to use.  They're watercolor, dual-tip, and have a variety of rich colors.  Since they're watercolor, you can add water and spread the color around.  It's lovely!  And the fine point and brush tip works no matter what you're doing.


I then grabbed a face from a magazine and used a paint marker to add color to her hair.  I also used one of my Studio G mini alphabet stamp sets for the word "envision."  Then I had some doodle fun with my Uni Posca white paint marker and my Sharpie pen.

Thank you so much for stopping by and checking out my art journal page.  Bye for now.


Wednesday, August 30, 2023

Mini Art Journal Day 5

Hello once again my crafty friends!

I'm so glad you're visiting today!  I have another page in my mini art journal for the Art Marks Challenge from Rae Missigman and Sandi Keene.

Day 5 - Commit


For some Art Marks Challenge history, you can click here.  And Rae's Instagram account here shows what's she's making for each prompt.  For those just tuning in, I'm working in a mini art journal I made out of envelopes, but you can use many different things, including scrap or underpaper, so some pages already had stuff on them.  A hole punch and some baker's twine and a mini art journal is born!

I'm planning to post all of my pages, though some may be individual pages and some may be in groups.


All of the Art Marks prompts are making me think.  Think about what the prompt means, not just to me, but in general.  Committing is big; you're promising something, even if it's just to yourself, for the long haul.  You can commit to training for a physical challenge, commit to education, commit yourself to family, or make a commitment to yourself.

But underlying any commitment is keeping the promise to keep doing it.  Even this challenge is in a sense a commitment, even though it's supposed to be fun and there's not exactly any consequence for not finishing it.  However, something I've committed myself to in my own life is improving my financial situation.  I know, people aren't supposed to talk money in polite company, but I think this is something we can all relate to in some way.  And I lie helping my friends, when I can.  I like to consider you all my friends.  That's why I'm sharing my artwork, and maybe a little money talk to help us both.  Committing myself to improving my financial situation involves a couple side hustles.  And I'm guessing we all either have one or have thought about one at some point.

In the spirit of helping you, my friends, I want to share a couple things with you.  Both are great, but take work.  One is Cliqly.  Super simple, You log in, spend 10 minutes sending e-mails, earning click commissions.  If you include your referral link, you can also earn referral commission.  No scams, honest.  Anyone can do this, no tech experience needed.  I mess around with art, not making money.  The other avenue is being an Amazon affiliate.  I share the products I love to use with you and I make a small commission on sales, without a price difference for you.  So thank you!

There's a lot going on in my background, so I'll go step by step.  First I made circles using my Sakura solid paint markers in blue and neon orange.  Next I sponged teal paint through a piece of punchinella.  Here's an example of what punchinella can look like when you purchase it.


What is punchinella?  It's sequin waste.  All those little circles are punched out sequins, but the waste is just wonderful.  You can do so much with it.  I've used it on its own on projext, you can cut it into shapes, or use it as a stencil.  There are some stencils with a punchinella pattern, but if you have some punchinella, you can use that too.  I discovered it years ago and fell in crafty love!  

After the punchinella, I traced a few letters through a stencil I have that looks like something you'd get for school supplies, and I sponged blue paint through the circle and star of a Dina Wakley stencil called The Basics.


A little black paint through my Dylusions Chequered Dots stencil and I outlined the border squares with my white-out pen.  I used mini wooden alpha stamps for the words "STAY THE" and American Crafts Thickers, similar to these but regular aqua in color, for "COURSE."  I think I've mentioned how much I love Thickers and how I have several sets.  This is another of those sets.


I added several details with my Sharpie pen.  The girl is actually a combination of a stamp set and a digi image.  The head and body are come from a Dylusions stamp set called Mini Moo that I colored with Tombow dual-tip watercolor markers.


I purchased mine individually, however this set is a good place to start.  The legs I cut off and decided to use later.  Instead, I grabbed the legs from the thinking girl I used earlier in my journal and added them here.  I think it looks just right.


Thank you so much for stopping by and checking out my art journal page.  Bye for now!


Sunday, August 27, 2023

Mini Art Journal Day 4

Hello my crafty friends!

I'm so glad you're visiting!  I have another page in my mini art journal for the Art Marks Challenge from Rae Missigman and Sandi Keene.

Day 4 - Think


I have done my fair share of thinking, and then some.  About everything.  The direction I want to go in life, the choices I need to make; thinking is a neverending process.  Thinking take up a good portion of most everyone's day, regardless of how big or small the choice is.  I also hink about art supplies and what direction I want my projects to go.

Part of thinking of where I want my projects includes what parts am I going to compose my project out of, and do I need to get any of them?  That may, of course, require making a purchase.  That's why I've been working on a couple different strategies to increase my cash flow.  One is being an Amazon affiliate.  All you have o d is follow the links Ive included to some of my favorite products and make a purchase. I get commission, but your price does not increase.  Another avenue I'm pursuing is a very simple e-mail system called Cliqly.  You log in, spend 10 minutes sending e-mails, earning click commissions.  If you include your referral link, you can also earn referral commissions.  You don't pay to get the referral link and this isn't a scam.  Anyone can do this, no tech experience needed.  I'm not messing around, at least not when it comes to this.  I mess around with art, not making money.

I'm also entering my page into these challenges:

Creative Fingers Challenge #260 - Anything Goes

Crazy is Our Fame August Challenge


For some Art Marks Challenge history, you can click here.  And Rae's Instagram account here shows what's she's making for each prompt.  For those just tuning in, I'm working in a mini art journal I made out of envelopes, but you can use many different things, including scrap or underpaper, so some pages already had stuff on them.  A hole punch and some baker's twine later and a mini art journal for the challenge is born!

I'm planning to post all of my pages, though some may be individual pages and some may be in group.


I covered my page with a couple different paints colors, including black through a handwriting stencil similar to this one and some yellow through my chevron stencil from The Crafter's Workshop.


I added some details using some circle stamps from a set designed by Julie Fei-Fan Balzer and a red dye stamping ink cube from a rainbow set I've had forever.  I also put some darker green paint through an older Dylusions stars stencil and then offset the stencil a little, grabbed my Sharpie pen and traced the stencil with my pen. 


The doodle border on the side is me playing with my Sharpie pen.  The letter tiles are from a old kit from Studio Calico, I think.  I have a set in blue as well.

My thinking girl is from Oddball Art.  I love my Oddball Art images.  So fun, and a little bit sarcastic.


Thank you so much for stopping by and checking out my art journal page.  Bye for now!


Friday, August 25, 2023

Gelli, gelli, who brought the gelli?

Plate, that is.  If you've never heard of it, that's okay.  I gotta tell ya though, it's a wonder.  It's magic.  It's so versatile and lovely.  Okay, I'm done now, maybe.

You really can do so much with a gelli plate.  It's jello made in a scientific way to it doesn't go bad and instead makes artistic wonders.


To gelli print you need a few supplies: gelli plate, brayer, paper, acrylic paints, and texture tools.

Here's a couple different gelli plate options:

Gel Press Gelli Plate 8x10

Gelli Arts Gelli Plate 8x10

 I believe Speedball also makes one.  Gelli Arts and I think Gel Press make several different sizes.  Gelli Arts also has small ones in different shapes.  So the possibilities are really endless.

A brayer is like a paint roller, only smaller and for art, not painting a room in your house.  Brayers also come in slightly different designs, but are very similar and work the same.

This is the one I have, and it works well for me.  Here's a couple more option as well:

Rubber Brayer, 4 inches

Speedball Rubber Brayer, 4 inches

When it comes to paper, you can use almost anything.  I've used notebook paper, cardstock, heavy white paper, deli paper, tags, manila folders.  According to Gelli Arts, newspaper ink can get absorbed into the plate as can photo paper coating.


Any kind of acrylic paint can be used, but I have found that less is more.  Too much paint, and its rolling over the sides.  You can always add more.  You want a thin layer, otherwise the texture can get lost.  I've done it myself, and it's not horrible, but I prefer the clearer prints.  This is actually where the type of paint is important.  I've used fluid or free flow paint before, but since it's thinner, you could end up with more than you bargained for.  Fluid or free flow is good for some things, but use a careful hand when pouring.  Or pour it on a piece of paper, roll the brayer in it and then roll it onto your plate.  All that being said, it's entirely possible for some bits or sections to stay on the plate.

In that case, you can do one of two things.  You can pull the paper off enough to see if it's sticking, and press down on the paper more to pull the paint, or you can do clean-up or ghost prints.  Another trick I've learned from printing and watching videos by other artists is you can apply white paint to your plate and that will pull anything leftover onto your paper.


 Last is texture tools, and these can be so many things.  Anything really.  A bamboo skewer you use to make lines, fabric, leaves, stencils.  You can also take old credit cards and gift cards, cut notches into them at different points, and drag them across for texture before pulling prints.


As you do it more, you'll learn you can experiment with many things.  I've seen videos for image transferring and using alcohol ink.  I myself have used packaging from other items to make circles or just weird random patterns that only that object can make.  When it comes to stencils, you can also pull the stencil print, then pull the other print separately, or add another layer of paint for a little or a lot of contrast and pull the print.


I've included some recent prints from a session, some of which has already been cut up and used on other projects.

Thank you so much for visiting!  Bye for now!

Tuesday, August 22, 2023

Mini Art Journal Day 3

Hello crafty friends!

I'm so glad you're here.  I have another page in my mini art journal for the Art Marks Challenge compliments of Rae Missigman and Sandi Keene.

Day 3 - Leap

Here's a peek:


My first thought was a leap of faith.  It got me thinking of what a leap of faith is; trying something and believing it will work.  Even if there are obstacles in your way, you don't let those obstacles stop you.

It's interesting because I've tried to do that in my life, recently to improve my financial situation.  I know, I know, isn't everyone?  Of course, and I hope you're succeeding in whatever endeavor you're trying.  One leap of faith I've taken is signing onto an easy e-mail system called Cliqly.  It's super simple, everything set up for you, and takes about 10 minutes a day.  You sign in and send e-mails, earning click commissions.  If you use your referral link, which you don't pay to get, you can also earn referral commissions.  It's not a get rick quick scam; it actually takes time.  However, putting the time in on the front end means you get the rewards long-term.

I'm also an Amazon affiliate.  Simply put, if you follow some of the link and make a purchase, I make a small commission.  So I'll thank you in advance.  Thank you!!

I'm also entering my page into these challenges:

Creative Fingers Challenge #260 - Anything Goes

Crazy is Our Fame August Challenge


For some Art Marks Challenge history, you can click here.  And Rae's Instagram account here shows what's she's making for each prompt.  For those just tuning in, I'm working in a mini art journal I made out of envelopes.  I've also done this out of scrap or underpaper, so some pages already had stuff on them.  A hole punch and some baker's twine later and tada!  A mini art journal for the challenge!

I'm planning to post all of my pages, though some may be individual pages and some may be in groups

Now for the reveal.  Drum roll please... 


This is a somewhat simpler page that morphed and morphed again before I was finally done with it.  I made the background using my scribbles stencil and purple paint.  A little subtler than I planned, but it works.  Then I used an old brick stencil from The Crafter's Workshop with two different paint colors: blue and black.  I'll give you three guesses which color I used first.  Okay, fine, I used my blue first, then offset the stencil and added the black.


Yes, I purposely made three line.  As I said, my original plan morphed, a couple times.  I used my white-out pen for a lot of the writing, as well as outlining the letter stickers.  Everyone feels differently about their writing.  One designer I really like, Ali Edwards, uses her handwriting in many of her stamps and images.

I'm still getting used to using my handwriting in crafting.  Sometimes I like it and sometimes I don't.  I tend to like others' handwriting better.  For some reason, it always looks cooler, but I'm still working on it for myself.


I used my black Sharpie to outline the words I wrote, as well as the doodle stitches on the labels.  The label has been sitting in my stash for a long time, and the label is long itself, so that's saying something!


The letter stickers are from a sticker sheet in my stash, and I used a Uni Posca fine point paint marker in white to outline the head.  The head, in turn, is from a Dylusions stamp set called Dependable Dolly.  It's an older one, so it can be harder to find.  Have I mentioned I have quite the stash?


I at first didn't have the labels on the head on the layout.  And I was okay with it...until I wasn't.


So I took to my stash of die-cuts, which are from kits, store-bought, and stamped images I colored and cut out, to find one that fit.

It was funny, because there were a couple I had thought to use, but they were actually too big!  One of the only issues I would say to working in a small journal.  Some images are just too big, even if you cut them.  But this head fit the space very nicely, and the little pops of purple matched the background in a subtle way.  Once I attached the head and labels, I called it done.


Thank you so much for stopping by and looking at my art journal page.  Bye for now!


Saturday, August 19, 2023

Collage This!

Sometimes I find it hard to get out my own head.  Creating has a few rules in a sense.  Like if you want something to stick to a page, something to hold it there.  Maybe adhesive on the back, wet paint, or a handy dab of glue.  But when it comes to other things, like ideas, there really aren't rules.  Sometimes I get stuck on what I think it should be, then I see something and realize, I gotta get outta the box!

That's just what I did with my entry for the More Than Words August challenge - Collage or College!

A couple quick notes before we get too far into our artsy playdate.  We all know we need to make a little extra money, right?  I do this in two ways: being an Amazon affiliate and the Cliqly e-mail system.  When you follow the links to Amazon and make a purchase, I make a commission.  It's helpful for me to continue making the lovely art that I hope you enjoy.  The e-mail system is a super simple way to make money online when you don't have a lot of time.  I mean ten minutes, and most people have ten minutes.  Everything is set up, you log in, send e-mails that are already written, and watch commissions roll in.  You even get your own referral link to include in the e-mails to get referral commissions too.  And yes, it's absolutely for real and super easy to do to bring in some nice extra money.  Who couldn't use that?

Now onto the show!


This art journal page got me rethinking how I could do something.  I really wanted wings, and was trying to figure out how to do that.  I thought of a few different ways: drawing, stamping, using paint or some other media to draw wings on.  Then I changed my thinking and grabbed my die-cut stash.  Bingo!  I grabbed word die-cuts that were similar in color, not necessarily white, cut them up in different sizes, and crafted my wings.  Then I used some white paint and my white-out pen to give a little uniformity and shape as well as add details, and I had my wings!


My background was already started a bit with bits of paint everywhere.  I added quite a bit of stenciling, one of my favorite techniques.  Some of my stencils are older and hard to find.  For this page I used StencilGirl Scribble Scratch Stencil by Carolyn Dube, similar to this one by The Crafter's Workshop and  Traci Bautista's Circles Circles Stencil with Artist Loft Red Paint.


 I also used this chevron stencil from The Crafter's Workshop with Liquitex Basics Yellow Paint.


I also used an older Dylusions alpha stamp set for "no", a mini alpha stamp set for "ON," Dylusions Bordering on the Edge stamp set for a border, and an acrylic stamp set from Studio Calico (I think) for the stars.


I also used magazine cutouts, since this IS supposed to be collage.  I used a set of legs from a Dylusions stamp set called Mini Moo and outlined the word "ON" with a Uni Posca Ultra Fine Point Red Paint Marker.


I'm also submitting this to the Simon Says Stamp Monday Challenge - Use Your Favorite Technique.

Thursday, August 17, 2023

Mini Art Journal Days 1 and 2

 Hello again!!  Who's ready for another adventure?  How about a little tease...


I love mini art journals.  There's less pressure and excellent for playing when you're short on time, even if you're using wet media, like paint.  This month Rae Missigman and Sandi Keene are doing an Art Marks Challenge.  You can start any time, do one day, do the whole month, whatever works for you.  And use whatever size journal you want.  Rae has these marvelous little cards that she plays one, one for each day.  Easy for those short on time and wanting to make some art.  For the Art Marks Challenge, there's a word every day to ponder and create art with, or around, or about, whatever suits you.  

For some history about the Art Marks Challenge, you can click here.  And to see what Rae is doing for the project, you can head to her Instagram account here.  I made a little book from envelopes.  Yes, you read that right.  I grabbed 8 envelopes, punched holes in the middle of the long sides, then used baker's twine to tie them all together.  For those of us still learning about actual bookbinding, this very rudimentary method works wonders!

So I have done some of the prompts, and I'll be posting multiple days in between other projects to give you my interpretation of the prompts.

A little housekeeping to get out of the way, while also educating you and sharing this with you.  It's related to art and not related to art, now that makes sense!  Obviously most art supplies cost money, and we could all use more of that, right?  I have a couple different methods I use to do just that!  One is so super easy I was thinking, no way this is for reals!  But it is!  And I've seen the numbers change while I'm doing it!  It's a simple e-mail system called Cliqly.  The system is provided for you, you do everything from the site and it takes 10 minutes a day!!  It's so easy and has two ways to make money.  It works like this: sign up and you get a list of 5,000 leads to e-mail with credits put into your account.  You also do what's called list building, which means you send out e-mails and anyone who clicks the links gets added to your list.  Your list literally grows every day.  You earn click commissions, as is someone clicks the link you get s small commission.  In the e-mails you can also add your own referral link, which you get when you sign up.  That's the big dollar signs.  So what you're saying-yes, what I'm saying is it's easy, dare a I say fun, and can make you money for a short amount of time, score!  So by all means, please, you can follow this link if you want a super easy way to get a some extra cash.

I'm also an Amazon affiliate, which means if you follow some of the links here and purchase products, I'll get a commission.  I would certainly appreciate it, and it helps me bring you all this artsy goodness.  I want you to be able to create what I'm creating as best I can.  So that's why I link to as many of the products as I can.  I often see something that inspires me and knowing the products helps me so much!    Now your project won't look exactly like mine, and that's okay!  That's what make every piece unique.  So the links are my way of helping you put your unique spin on the artwork.  And with that, on to the show!

These are the first two days of the Art Marks Challenge.  I've linked to as many products as I could find, however, some may no longer be available.

Day 1 is Begin.


To make the background, I used a flat brush, the center one in this set, and my finger to spread around three different colors: Artist Loft Neon Green and Liquitex Basics in Light Green and Aqua Green.  Very technical with my finger, absolutely.  To make the actual book, I used supplies I had on hand, envelopes from the mail.  Yes, you heard me.  You can use anything, really.  I've used underpaper, patterned paper I no longer love, scraps, as long as they're long enough to fold in half, they're fodder.  My binding method isn't super technical either at the moment.  I used a single hole punch (here's some great options, mine is the silver one with the attached tray under the hole; very important!) to punch two holes through eight envelopes and used one of my favorite supplies to tie them together: baker's twine.


Once the paint was dry, I added my elements.  I thought about the word begin, and what it means.  One way is every day is a new beginning, so I followed that train of thought.  I used a big die-cut from my stash, black cloth Thickers alphabet stickers (the design is called Doll) from American Crafts, same font as these American Craft Glitter Thickers, and a heart sticker from this set of Pinkfresh Studios Stickers.  I also used other supplies including an acrylic alphabet stamp set for "every."  The triangles are from a stamp set by Julie Fei-Fan Balzer.  On the top die-cut, I used a Uni Posca Red Paint Marker Ultra Fine to write the word "EVER."  Those paint markers come in at least two different points, ultra fine and medium, and I've got colors in both.  I love paint markers.  I find them a great method of adding color without having to wait a huge long time for the paint to dry.  They come in a huge variety of colors, and different tips to cover all your crafty needs!


The bottom border is a stamp from a stamp set made by a Polish company called Badass Art Stamps.  I had a subscription at one point ad have several sets.  Some have cursing, I will warn you, but they're beyond funny and the style is so stinking cool!  I of course used my black Sharpie pen and my white out pen, similar to these, to add some more details and called it done!


Day 2 is Decide.


For this page I started with a red Sakura Solid Paint Marker for the background.  I didn't do full coverage on purpose.  I also used a older Dylusions alpha stencil in two ways.  I used a makeup sponge to add some yellow acrylic paint through the stencil, as well as using my Sharpie to trace letters through the stencil.


Depending on the kind of paint you use you'll get more or less coverage.  It also depends on the effect you're going for, and I will get into that at some other point.  My yellow paint is student quality, so pretty transparent, which I really like here. 


The words "can't decide" is from a mini alphabet stamp set similar to this one and a little cat's eye shaped ColorBox Pigment Ink Pad in blue.  And therein lies another aspect: different types of stamping ink.  To give you a few: dye, pigment, embossing.  Another topic I will get into later, so stay tuned! 


I used a couple die-cuts from my stash, and a stamp set from Julie Fei-Fan Balzer for the blue and black circles.  The "I'm" are white American Crafts Foam Thickers.


Thank you for much for visiting!  Bye for now!


Wednesday, August 9, 2023

Summer Fun

 Hello there!  Ready for some more crafty fun??  I'm joining the Simon Says Stamp Wednesday Challenge, which is.... Summer!

I love summer.  The warm weather, the beach, the colors, the fun.  School's out for some, but it's fun for everyone.

My entry for this challenge is a tag.  I absolutely love tags.  I may become a broken record with all the things I love, but it's true.  Similar to ATCs, tiny canvasses that are ripe for experimentation and play!


In looking through my tag stash, I chose this one.  The background is fairly simple, but still lots of fun.  Over top of some purple paint is green paint through a stencil designed by Ronda Palazzari for The Crafter's Workshop called Subway.  A subtle design that can make a big impact.


Combing through my stash, I grabbed a piece of stenciled cardstock and a butterfly die from Kaisercraft.  Butterflies say summer to me for sure, and all the bright colors of flowers blooming in summer.  I grabbed my Cuttlebug and made my sandwich.  For the sandwich, I set the die against the section of paper I chose and put that between two cutting plates.   I then placed a spacer plate underneath, along with some pieces of cardboard to get the right thickness so the die will cut through the paper.  I ran my sandwich through a couple times and out came the butterfly.  Now the actual die has little holes all over the non-sharp side so you can poke out the garbage pieces as well as get the die-cut out of the die.  I used my EK Tools Tweezers to poke out my butterfly. 


Next I grabbed my Dylusions stamps, again.  Yes, I may have a problem, haha.  The eyes were already stamped from the Pondering Petunia stamp set, cut out, and colored.  See anything special about the eyes?  Psst...they're two different colors, green and blue.  I love ready made bits and bobs to add to my projects.  Thephrase is from another Dylusions stamp set called Say It How It Is.  I love the attitude inherent in these stamps.


See the different color eyes now?  It was a surprise to me too; I had forgotten I even colored the eyes differently.  The swirly red circle, heart, and "where to next?" die-cut are all from my stash.  The red swirl is a fussy cut from a piece of double-sided patterned paper.


As you can see I also swiped some Artist's Loft Ultramarine Blue on the butterfly for a little added effect.


I stamped the bottom of the tag using a mini star background stamp from an old acrylic Studio Calico stamp set.  Then I attached a piece of netting from an old laundry bag.  I put the netting on top because it reminded me of boating, which I've done a little of and it reminds me of summer and going out on the water.  The heart and word die-cut are from past kits.


I glued everything down with Crazy Glue, and used my black Sharpie (I mentioned it's a favorite of mine, right?) to outline the edge of the tag, the heart, the inside of the "where to next?" die-cut, and lastly filled in the open spaces in the letters from my Dylusions Say It How It Is rubber stamp set.  I really like how it turned out.

Thank you so much for coming along.  Bye for now!


Busy, busy, busy...

I am so sorry I have been absent without a word.  Life can definitely get busy and sometimes unexpected events lead to adjustments. I will b...